DHS Diecast Discussion Forum
Welcome Guest Search | Active Topics | Members | Log In

LTM1300 Mammoet Party - Decals and a Special Treat - part vii Options · View
Bobm2004
Posted: Sunday, January 02, 2011 11:35:12 PM

Rank: Advanced Member
Groups: Member , Moderator

Joined: 1/15/2007
Posts: 4,089
My friends here we are at the very fun part of the job! Decals!! Decals add that small amount of detail that in my opinion bring the whole project together. So please gather round, grab some of those homemade peanut butter cookies baked by my mom and lets get decaling!

First though, anyone know what these are?


Right Guso they are read triangles printed on a sheet of white to make safety corners for the counter weights!!


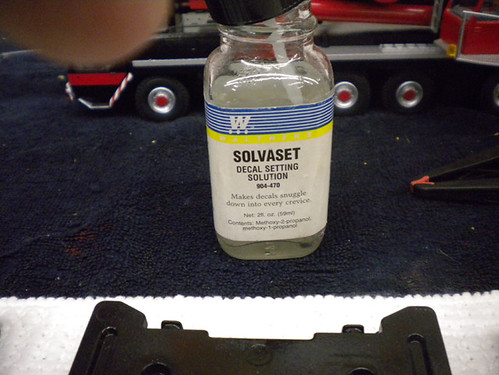
Here is a product I have highlighted before, Solvaset. It is a necessary tool in placing water slide decals. As your decal is soaking, brush on a small amount of Solvaset on the target area. It will allow the decal to slide around for proper positioning. Once there, blot with a piece of paper towel to remove excess. As it dries the decal gets sucked onto the model conforming to every countour of the model, including grating. This is good stuff my friends!


Now you want to talk about no guts, no guts glory! One of the YCC add on pieces is the hydraulic house reel for the boom sections, which I forgot to add on. So grab the drill and drill the finished boom-but first extend the inner sections!!!!! No drilling in to them!!!!!


Now we begin the fun stuff, Mammoet decals!!!! The boom head gets a chevron and the cab the first Mammoet!


And adding the door Mammoet, mammoth to the front always!!


Adding more to the boom


And do not forget the tail lights


And the decaled rig, number 944:


Here is the bonus, the owner of the model has asked me to assemble the model for all of you!!!


Here is one of my own add ons, a chain to the front of the unit for the hook block to connect to.


Time to pack up!!


Well that completes this project!! 145 photos, seven parts, 43 hours of project time and thousands of cookies!!!

I hope you all have enjoyed this and maybe even inspired some of you to even give it a try! The LTM1300 is a great crane to try this type of project!!!

Off to the kitchen for some milk............


Bob
Bobs Cranes

Come Over To The Lift Side . . . . . . . We Have Cookies!!!!
cranedude07
Posted: Sunday, January 02, 2011 11:45:57 PM

Rank: Advanced Member
Groups: Member

Joined: 9/22/2007
Posts: 5,860
Location: Louisville
Awesome job bob, looks great! I'll hopefully get this crane and ycc luffer for it this yearPray

Brandon

my youtube channel
My Facebook Page
bigcranes
Posted: Monday, January 03, 2011 3:49:53 AM

Rank: Advanced Member
Groups: Member

Joined: 1/22/2008
Posts: 2,027
Location: Maryland
Great job Bob, she is beautiful! I snuck a cookie, they were deliciousTeeth

Mark

Mark L.

It's what you learn after you know it all that counts
GusO
Posted: Monday, January 03, 2011 8:03:28 AM
Rank: Advanced Member
Groups: Member

Joined: 2/5/2009
Posts: 1,990
Location: waterford ireland
fantastic bob, most enjoyable following this along the way all stored to the favourites for future referance have to get starter on the cc first are you after moving on from the rub on decals?
well done gus.
Paul R
Posted: Monday, January 03, 2011 3:01:49 PM

Rank: Advanced Member
Groups: Member

Joined: 1/11/2007
Posts: 9,039
Location: Lincolnshire
Nice job Bob. Looks really good! Wished I live close to you so I could rent out that nice heated workshop you have for some projects of my own!

Paul R
Bobm2004
Posted: Monday, January 03, 2011 11:05:50 PM

Rank: Advanced Member
Groups: Member , Moderator

Joined: 1/15/2007
Posts: 4,089
PaulR-that big ol 747 will bring you right to me! Instead of trapsing all over the world, you could come have a vacation right here in Mammoetville!!!

Bob
Bobs Cranes

Come Over To The Lift Side . . . . . . . We Have Cookies!!!!
drdcco
Posted: Tuesday, January 04, 2011 1:34:26 AM

Rank: Advanced Member
Groups: Member

Joined: 8/9/2002
Posts: 1,375
Location: Harrisburg, Pa
Great work as always Bob,,Thanx for the post..
Dave

Nothing is impossible,,just difficult....
Lima 70T
Posted: Tuesday, January 04, 2011 1:38:11 AM

Rank: Advanced Member
Groups: Member

Joined: 12/23/2008
Posts: 390
Location: Burnie, Tasmania, Australia
bloody brilliant Bob. Well done.

As Mammoet says "SIZE DOES MATTER". Slowly collecting Mammoet 1:50 scale stuff. Mainly cranes!
HunterH
Posted: Tuesday, January 04, 2011 1:46:15 AM
Rank: Advanced Member
Groups: Member

Joined: 3/23/2010
Posts: 550
Location: So Cal
Very nice job on the repaint thanks for the step by step process! and your garage looks more like a woodshop than a model shop Teeth Have any pics of what you build in there?
EliMax
Posted: Tuesday, January 04, 2011 2:23:37 AM

Rank: Advanced Member
Groups: Member

Joined: 6/18/2007
Posts: 1,025
Location: South of the Weminuche
Superb finishing skills make the model and , Bob, You HAVE those skills.

Many of us have know a long time about your refinishing ability. The fact that you still keep sharing with us each and every aspect of the process is a testament to your commitment to this hobby. Thanks for continuing to share on an an ongoing basis and thanks for the monitoring you do. It seems to make a difference.Applause

Happy New Year, Bob!Cool


https://www.facebook.com/pages/Elis-Hobby-Diecast/803248369690387?ref=hl
Users browsing this topic
Guest


Forum Jump
You cannot post new topics in this forum.
You cannot reply to topics in this forum.
You cannot delete your posts in this forum.
You cannot edit your posts in this forum.
You cannot create polls in this forum.
You cannot vote in polls in this forum.

SoClean Theme Created by Jaben Cargman (Tiny Gecko)
Powered by Yet Another Forum.net version 1.9.1.8 (NET v2.0) - 3/29/2008
Copyright © 2003-2008 Yet Another Forum.net. All rights reserved.