|
|

Rank: Advanced Member
Groups: Member
Joined: 9/7/2005
Posts: 1,155
Location: Copake, NY
|
I built this crane years ago and it took me a long time to finish and in a sense it was never finished. I painted it red, but I was never happy with the result and over the years I made lots of small repairs and alterations. During the last day of the Cabin Fever Expo something broke and in order to repair it I needed to take the whole thing apart and then I decided to just do it and repaint it. It took me about 6 weeks of cleaning, sanding and re-finishing and here is the result. i also added dome more details. Before: 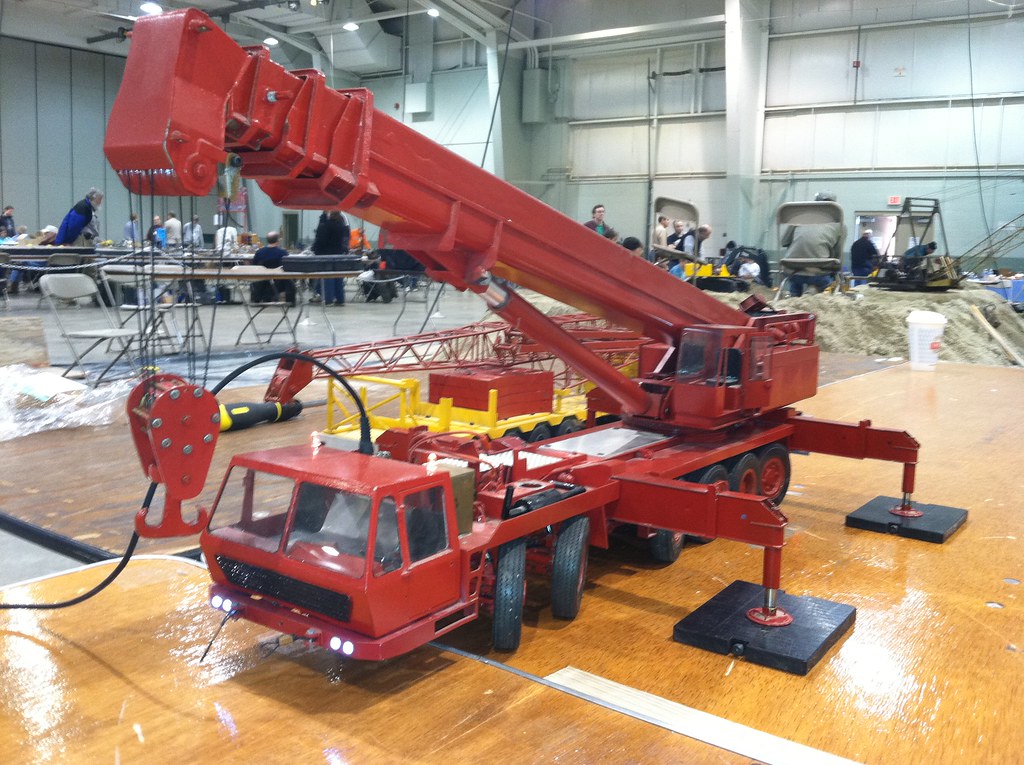 And after: 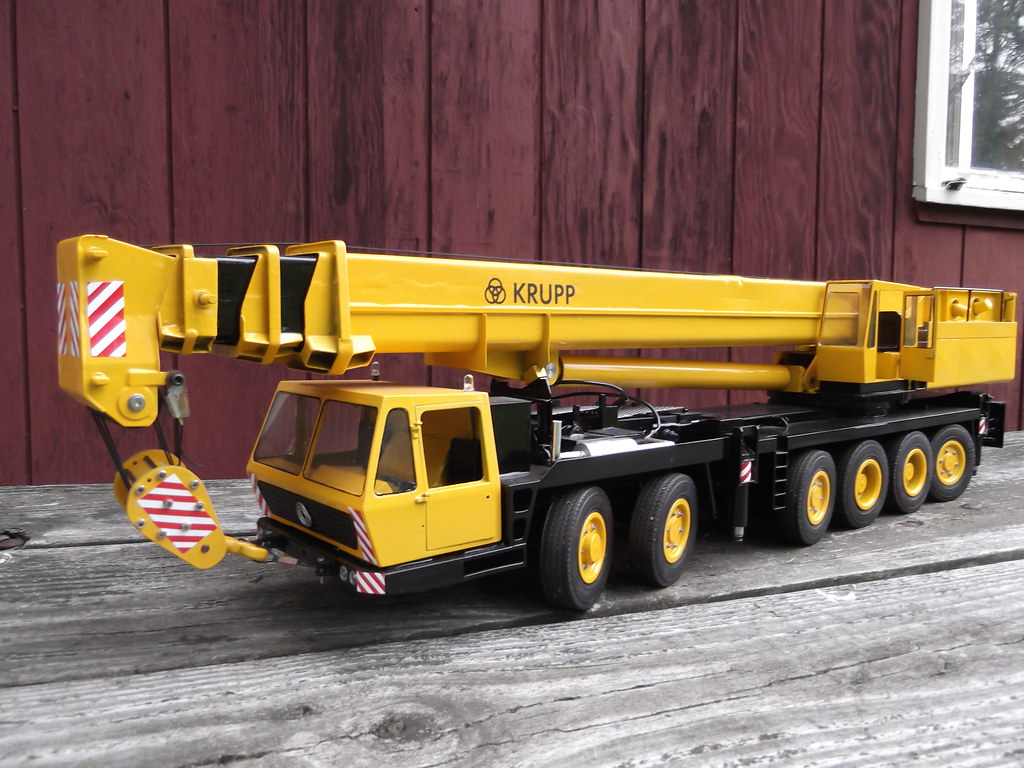 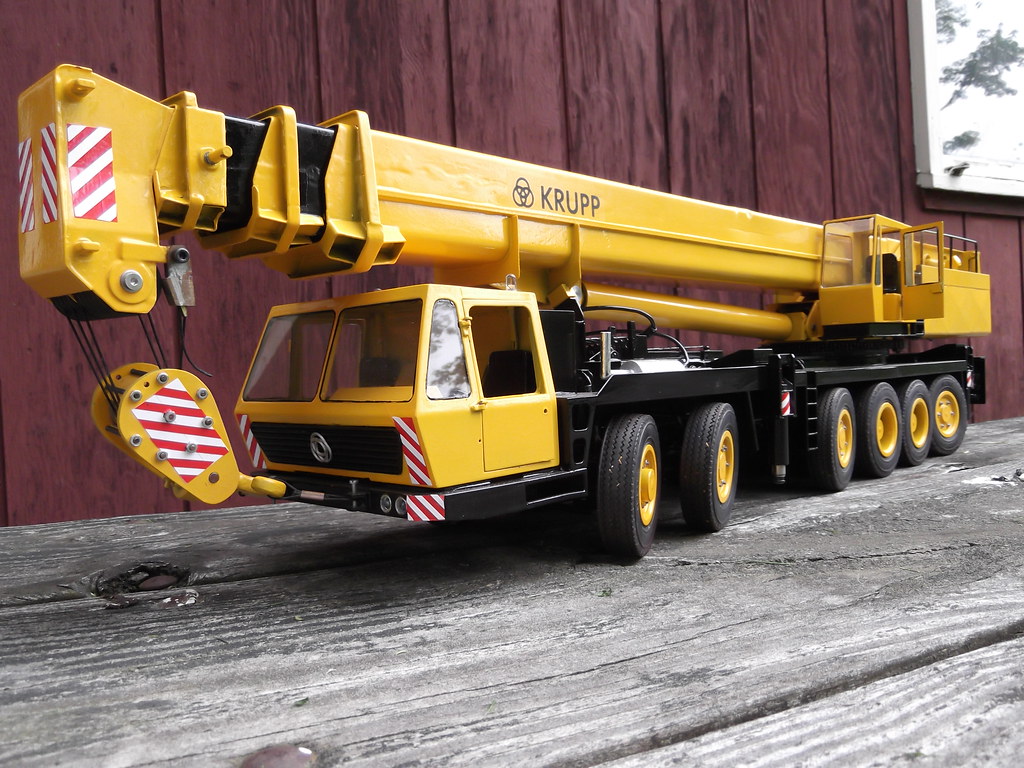 Kerst
 http://forums.dhsdiecast.com/default.aspx?g=posts&m=1096251 http://forums.dhsdiecast.com/default.aspx?g=posts&m=1096251
|
|

Rank: Advanced Member
Groups: Member
Joined: 6/30/2003
Posts: 4,920
Location: Melbourne, Australia
|
Outstanding Kerst! What scale is it built in? How long was the build process for this piece? Rowan.
1:25th scale CAT 375L excavator
|
|
Rank: Advanced Member
Groups: Member
Joined: 9/7/2005
Posts: 1,155
Location: Copake, NY
|
Thanks! The scale is 1/20 and it took me (too) many years to build including many long interruptions. And the crane is fully functional. Kerst
http://forums.dhsdiecast.com/default.aspx?g=posts&m=1096251
|
|

Rank: Advanced Member
Groups: Member
Joined: 11/9/2009
Posts: 760
Location: Mexico...cabrones!
|
Nice piece of machinery!!! I want one!!
Congrats.
Jose.
The proudly Mexican cookie monster!
It's a diecast thing.You couldn't understand!
|
|

Rank: Advanced Member
Groups: Member
Joined: 8/8/2002
Posts: 5,515
Location: New Jersey
|
Sharp looking, a big improvement and full operational... well that just iceing on the cake !
Chet
I live in my own little world it's ok they know me here
|
|

Rank: Advanced Member
Groups: Member
Joined: 9/6/2006
Posts: 675
Location: Southern Ontario Canada
|
nice work
|
|
Rank: Advanced Member
Groups: Member
Joined: 10/31/2006
Posts: 478
Location: Alexandria, Virginia
|
Kerst.....
That is fantastic !
Chip
|
|

Rank: Advanced Member
Groups: Member
Joined: 1/11/2007
Posts: 9,079
Location: Lincolnshire
|
Looks incredible and a testament to your hard work.
Paul R
|
|

Rank: Advanced Member
Groups: Member
Joined: 1/14/2006
Posts: 667
Location: The Netherlands
|
Very nice paint job and upgrade , yellow looks much better. Eef
*** Flickr American cranes group*** 3D printed crane parts at I.materialise
|
|
Rank: Advanced Member
Groups: Member
Joined: 5/23/2011
Posts: 403
Location: Waterford, Ireland
|
Very nice  Looks much better in the Krupp yellow 
|
|

Rank: Advanced Member
Groups: Member
Joined: 2/16/2009
Posts: 903
Location: Peace Dale, R.I.
|
Kerst, I never get tired of looking at your models. Nice restoration!! Have you had your Ringer out of mothballs lately?
__________________________________________________________________
Tom
It's pretty sad when the only modeling tool you own is a box cutter.
If the only tool you have is a hammer, you start to see every problem as a nail. Abraham Maslow
|
|

Rank: Advanced Member
Groups: Member
Joined: 1/22/2008
Posts: 2,027
Location: Maryland
|
Very nicely done! I like the new paint job too.
Mark
Mark L.
It's what you learn after you know it all that counts
|
|

Rank: Advanced Member
Groups: Member
Joined: 6/9/2010
Posts: 779
Location: Alessandria, Italy
|
|
|
Rank: Advanced Member
Groups: Member
Joined: 6/21/2010
Posts: 308
Location: Odense, Denmark
|
wow awesome work, why not make a video on how it works, would love to see that!!
|
|
Rank: Advanced Member
Groups: Member
Joined: 9/7/2005
Posts: 1,155
Location: Copake, NY
|
|
|
Rank: Advanced Member
Groups: Member
Joined: 9/6/2006
Posts: 675
Location: Southern Ontario Canada
|
thats one sweet set up
|
|
Rank: Advanced Member
Groups: Member
Joined: 9/7/2005
Posts: 1,155
Location: Copake, NY
|
After 4 years I decided to upgrade the RC controls. I learned a lot while building the Euclid and i am confident to make all carrier functions RC controllable. The Krupp has a powershift gearbox with 3 speeds and an auxiliary box with 2 speeds. The transfer box has a differential which can be blocked. That takes 5 channels. It will be fun to be able to control all these functions remotely. So far:   Kerst
http://forums.dhsdiecast.com/default.aspx?g=posts&m=1096251
|
|
Rank: Advanced Member
Groups: Member
Joined: 9/7/2005
Posts: 1,155
Location: Copake, NY
|
The rebuilding is complete! After I rearranged the carrier and made all functions (except for the outriggers) RC controllable, I started work on the upper. I was never happy with the upper and I decided to take all the motors out and replace them with new ones. I also changed the telescoping mechanism and installed the motor and spindle in the boom. That is a great improvement. The hoist also uses a spindle, but a better one than the old one. The counterweight has a motor inside and this way it can attach itself to the upper. All together there are 6 functions. Since I have only 4 feeds I had to add 2 switches on the upper. With all these changes I gained a lot of space and there was ample space for a battery for the carrier. It connects with a plugin cable. With all this rebuilding I tried not change the parts that worked well. I am pretty happy with the result, although some painting is needed, The motor compartment of the truck:  The new swing motor and the 2 motors for the winches.  The boom hoist  Here a comparison of the old and the new.  The other side. Lots of electric connectors. The battery is connected via this little storage box next to the hoist cylinder.  Kerst
http://forums.dhsdiecast.com/default.aspx?g=posts&m=1096251
|
|

Rank: Advanced Member
Groups: Member
Joined: 6/27/2007
Posts: 1,489
Location: St. Louis, Missouri, USA
|
Thanks for sharing the upgrades. Your all-around skills are unbelievable, and I hope you are teaching them to someone. Your confidence to take on, and follow through to completion, these projects is admirable. Now, for your crane operation safety: Boom up, outriggers in will end up in another "refurbishment" project for this model. 
|
|
Rank: Advanced Member
Groups: Member
Joined: 9/7/2005
Posts: 1,155
Location: Copake, NY
|
|
|
|
Guest |
