|
|
Rank: Advanced Member
Groups: Member
Joined: 8/11/2016
Posts: 200
Location: Orlando, FL
|
OK, so having recently begun collecting, I have purchased some used models (mostly cranes) to build up my collection at cheap prices. A good many times, buying used cranes (especially on eBay) has not gone so well for me because of missing/damaged parts. For example, one of my first eBay purchases was a Conrad Liebherr HS 885 - which really wasn't a bad purchase price wise - but it was missing 1 (of 6) 8mm sheave. Just one little missing 8mm sheave ended up costing me a lot of time and money to finally replace. That was a while ago now, and I have been studying all the tips and tricks posted here on DHS. By the way, "thank you" all for sharing your wisdom, as it is very much appreciated - specifically by me, but I am sure by a lot of others just starting out in the hobby as well. So, I get an opportunity for a great deal (again on eBay) on a used Conrad Liebherr HS 843 Dragline, and I won the bid. Yippee. Of course when I go to assemble this crane, my great deal suddenly has a small issue. 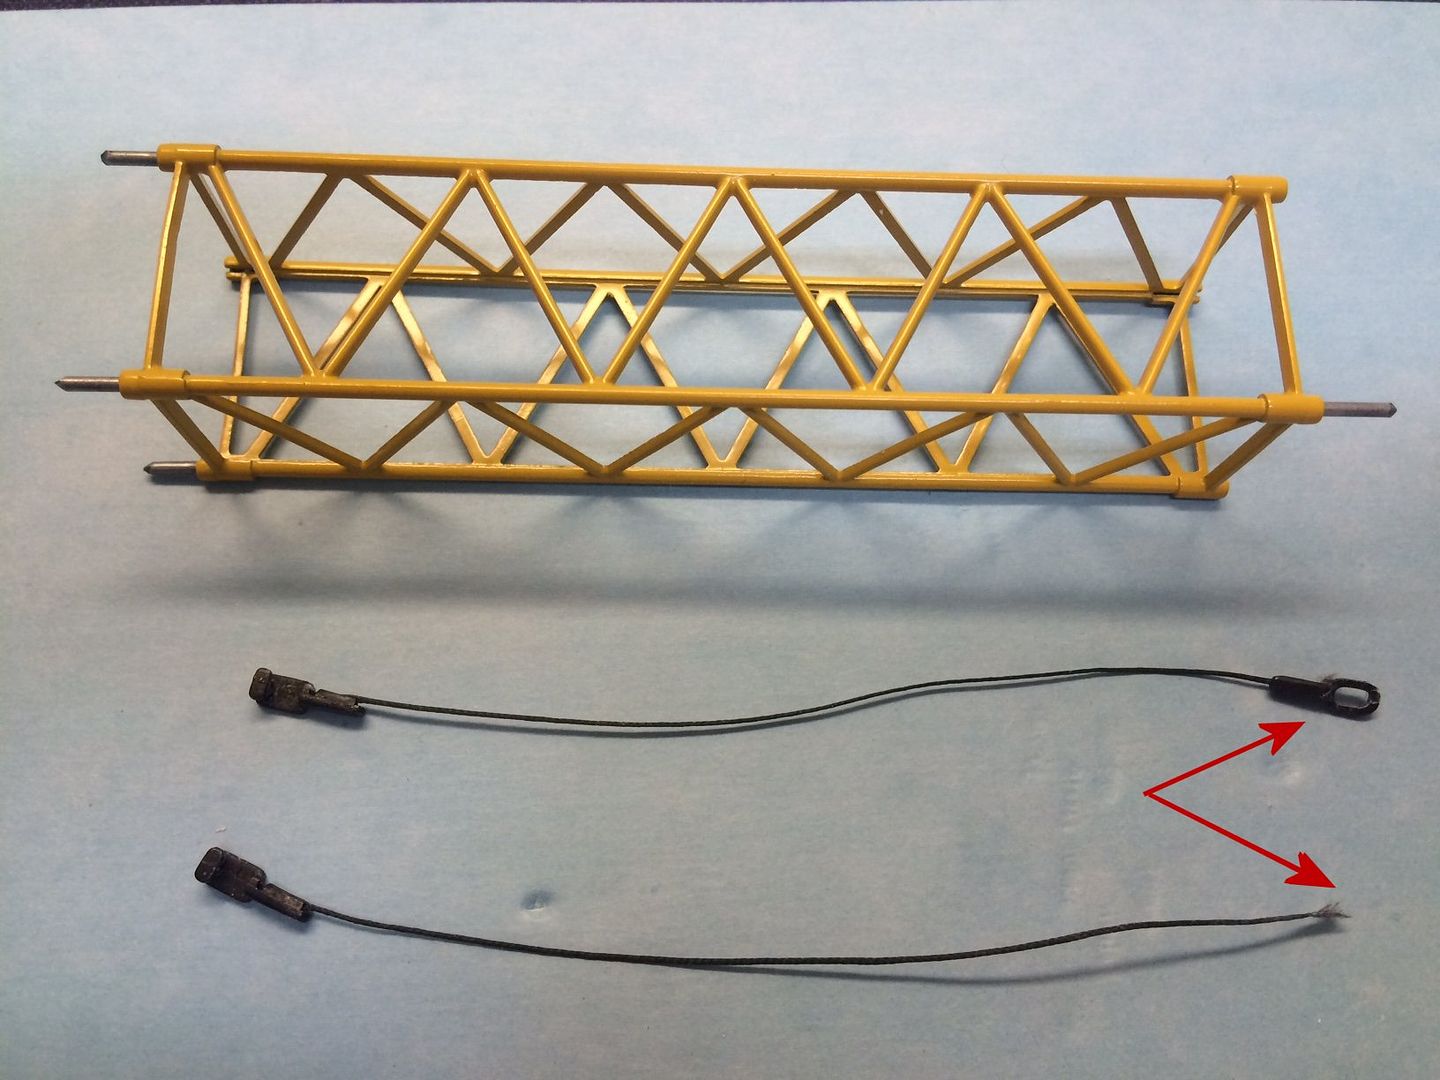 The ring end is missing from one of the boom pendants. Oh joy, another problem. So as I see it, I have several options: 1) Just assemble the crane short boomed (minus one section). 2) Email Conrad to see if they had, and would sell me, a replacement pendant. I actually had tried this option before to purchase a replacement sheave that I mentioned previously. This is likely a viable option except it takes months for them to reply, and they are a little pricey (example, see their response to me below regarding the 8mm replacement sheave): We have received your inquiry. We check our Warehouse. Please have patience. For your information the parts are not free.
Sheave: EUR 4,50
+ service charges: EUR 10,00
+ post/package: EUR 3,70
Please reply. Thank you.
With best regards,
Conrad GmbH3) Purchase a Conrad Liebherr boom extension kit on eBay (which is really just 2 used HS boom sections and 4 pendants) for $100 + shipping. 4) Ask if any one in here had a spare they would sell.  5) Try to make my own repair. Well, you can see I started with option 1). But every time I looked at my HS 843, I just cringed. ARGH! In my next post, I am going to move on the option 5) (which admittedly is beginners stuff in here, but the inspiration definitely came from here, so I am posting in case it might help out another newbie in the hobby). 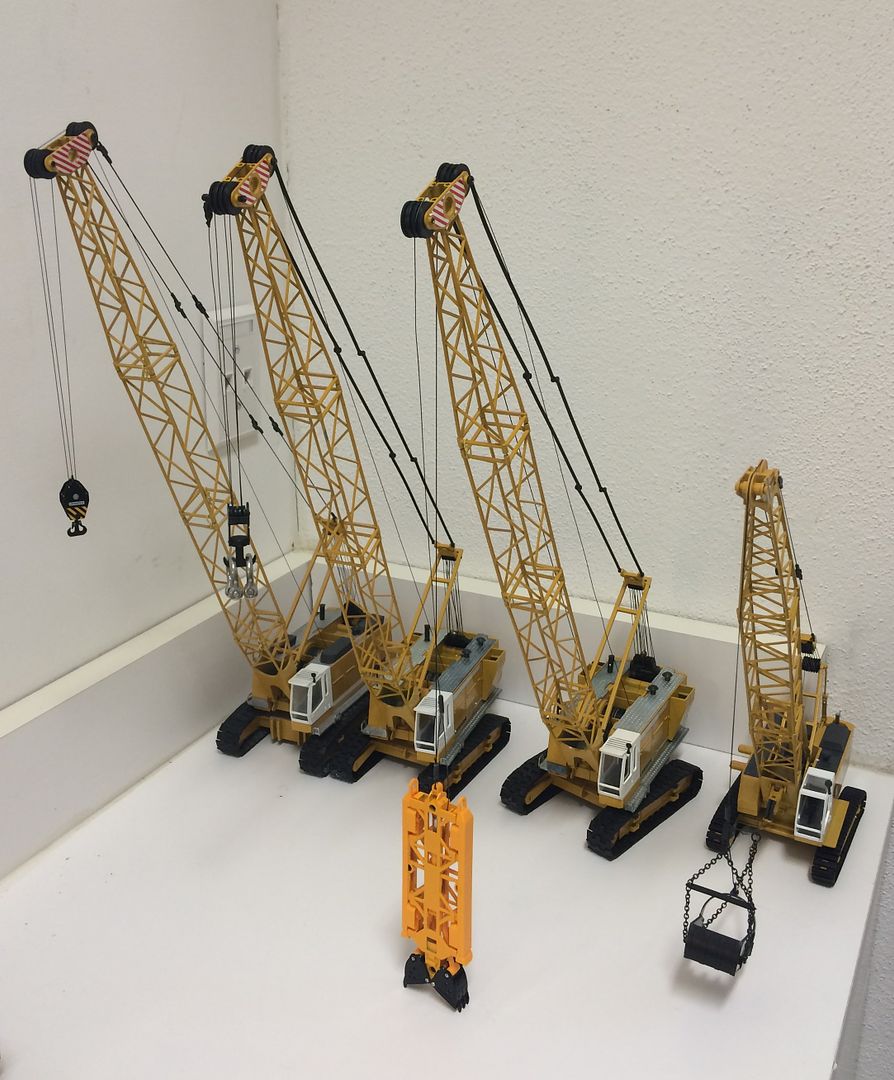
|
|
Rank: Advanced Member
Groups: Member
Joined: 8/11/2016
Posts: 200
Location: Orlando, FL
|
Now I am not all that mechanically inclined, and I have no machining tools, so making something out of metal or die cast greatly exceeds my capabilities. However, I have seen some incredible work in here using styrene (which inspired me to play around with it some) so I decided I would see if I could make a repair in that manner. I got really lucky in that the missing piece was the ring finality (female end) of the pendant, as the other end would have been substantially more challenging of a repair. 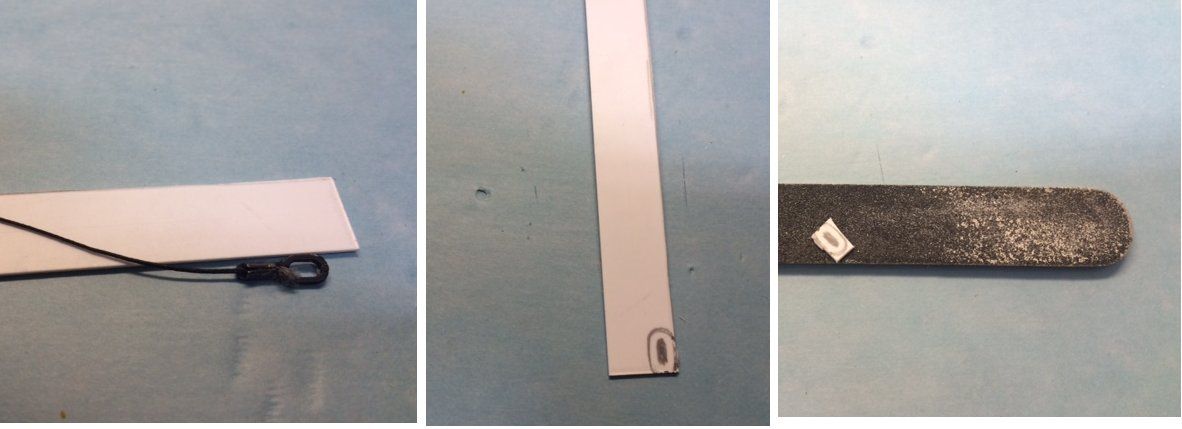 I selected a strip of styrene that was the same thickness as the finality ring, I then traced the piece on the styrene, and finally cut out a workable size piece. Then I proceeded to sand away everything that didn't look like the ring finality.  At first I glued the metal ring to the styrene piece and tried sanding that way, but that experience didn't go as well as expected as the metal part wouldn't adhere properly (you want to be able to separate them later). So I ended up just sanding the piece freehand. However, tack gluing two pieces of styrene together to form identical pieces does work very well. 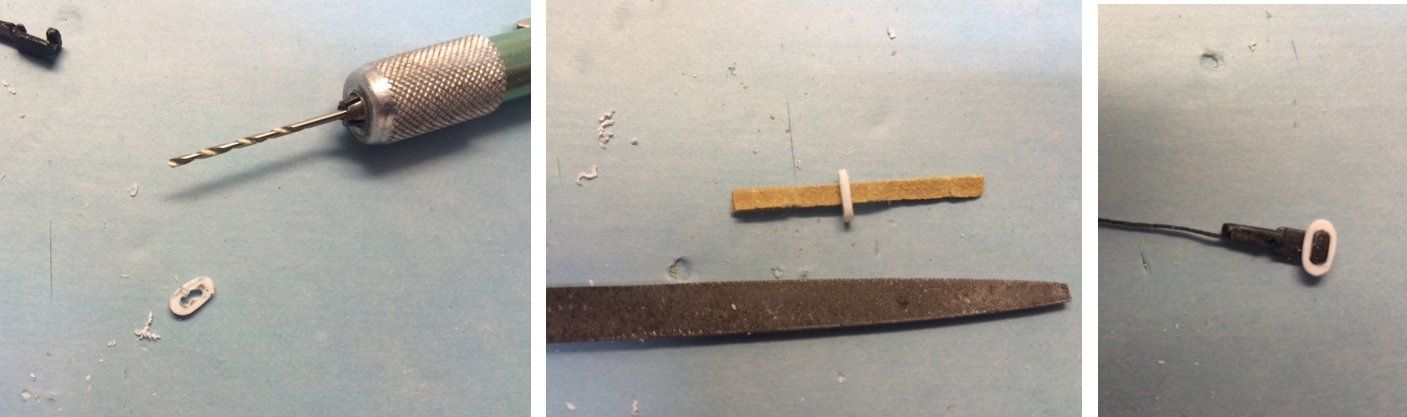 Obviously, the next step is to create the ring opening which required some drilling to get started. Of course, more sanding is required to get the opening correct. I used a rat tail file, but found that using a small piece of folded sandpaper is a pretty powerful tool for this process. Of course I checked the fit often with the male finality. 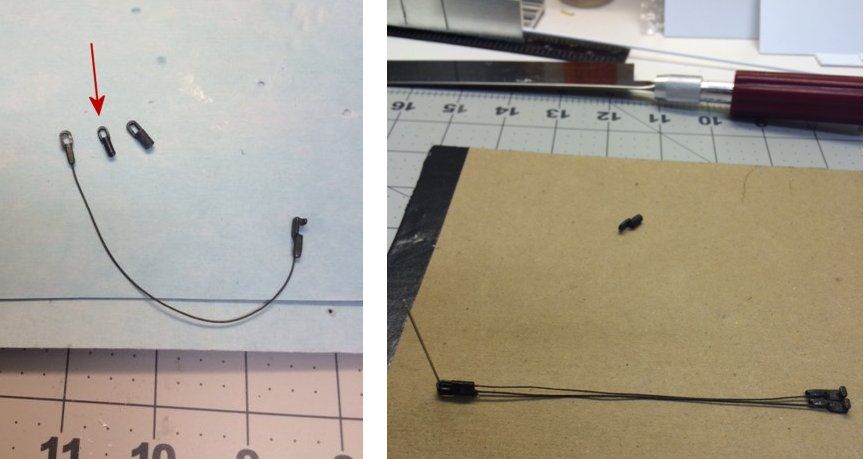 After getting the ring piece completed, I merely attached a small piece of styrene tube to the ring to complete the finality (I sanded the bottom of the tube to sit flush on the ring piece). You can see I made a FUBAR on my first attempt because the smallest diameter tube I had was 1/8" and you can see it is oversized. So I picked up some 3/32" styrene tube at the local hobby shop (which was a better match diameter wise and still allowed enough space for the pendant thread to pass through) and started over again. Last it is just a matter of getting out the Musky Master and replacing the pendant line to the correct length, and now there are two pendant lines instead of just one. 
|
|
Rank: Advanced Member
Groups: Member
Joined: 8/11/2016
Posts: 200
Location: Orlando, FL
|
At least now I can look at it without cringing. LOL 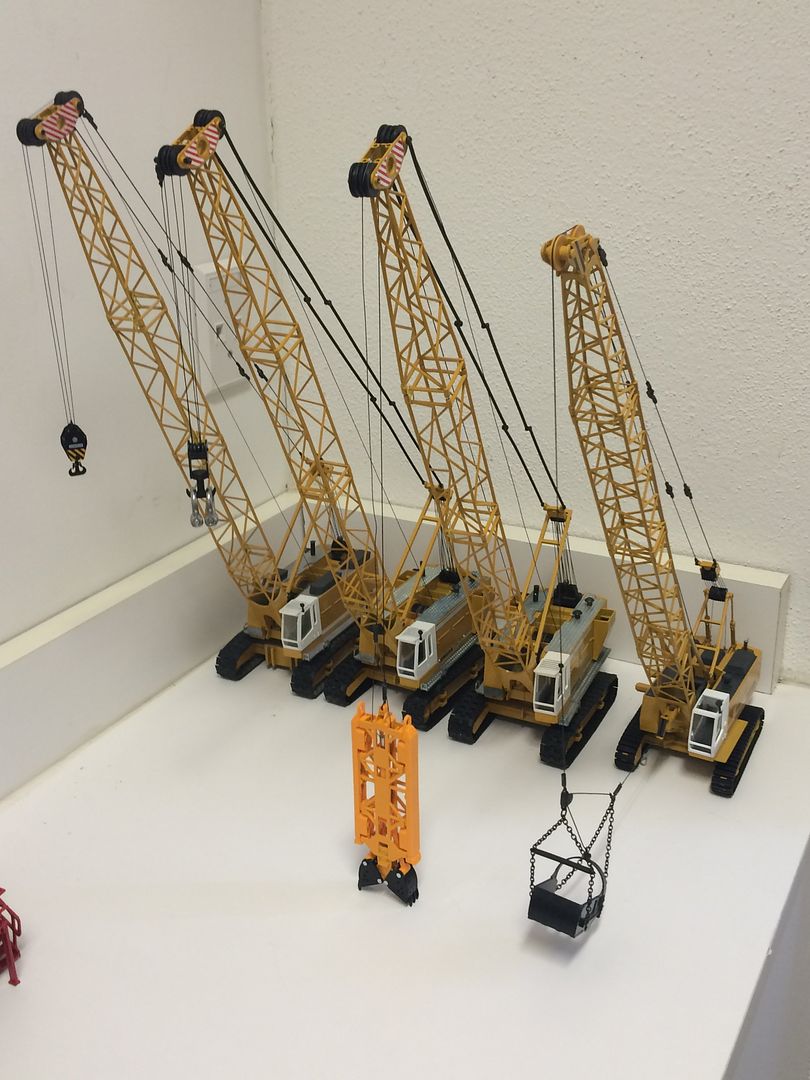
|
|
Rank: Advanced Member
Groups: Member
Joined: 1/22/2013
Posts: 203
|
Great work Don L ! Welcome to the club. Just shows what you can do if you really try. Now that you got bit by the bug, I look forward to seeing more of your work.
|
|

Rank: Advanced Member
Groups: Member
Joined: 12/30/2008
Posts: 3,439
Location: Good ol' Indiana
|
Looks like you took more initiative than I usually do. I am too quick to smear on some super glue and call it good. Good to see you took the time to do a proper repair.
-Ethan Collection 8/2/2016For more of the Diorama and my collection: On Facebook or On YouTube
|
|

Rank: Advanced Member
Groups: Member
Joined: 6/27/2007
Posts: 1,489
Location: St. Louis, Missouri, USA
|
Nicely done!
|
|
Rank: Advanced Member
Groups: Member
Joined: 8/11/2016
Posts: 200
Location: Orlando, FL
|
Campmb wrote:Great work Don L ! Welcome to the club. Just shows what you can do if you really try. Now that you got bit by the bug, I look forward to seeing more of your work. Thanks for the warm welcome Campmb. Admittedly, this is beginner stuff, but everyone has to start somewhere. Honestly, I would not have been able to fix this simple pendant 6 months ago. Hopefully, I will be able to progress to higher levels. Some DHS members are already mentoring me.
|
|
Rank: Advanced Member
Groups: Member
Joined: 8/11/2016
Posts: 200
Location: Orlando, FL
|
Basketball Man wrote:Looks like you took more initiative than I usually do. I am too quick to smear on some super glue and call it good. Good to see you took the time to do a proper repair. Hah, Basketball Man. I have seen the high quality level of your work, so I am not falling for that one. Thanks for the reply.
|
|
Rank: Advanced Member
Groups: Member
Joined: 8/11/2016
Posts: 200
Location: Orlando, FL
|
JohnGalt wrote:Nicely done! Thanks for the kind words JohnGalt.
|
|
Rank: Advanced Member
Groups: Member
Joined: 9/11/2016
Posts: 87
Location: The West Island of NZ
|
You would have to be happy with that as an end result , job done !
Thats a fairly small piece your working with , but for something a bit larger would starting with a bit of rod rather than tube be viable ?
Drill a hole in one end to suit the thread , file a couple of flats and shape the other end..same end result just a different way to get it done.
|
|

Rank: Advanced Member
Groups: Member
Joined: 6/4/2006
Posts: 7,744
Location: arlington, Tx
|
Looks good you have to start somewhere, i have been building for 9 years now nothing beats it but theres not enough time in the day for everything. If you need different style pendant lines i can do the same as the 855 which is a great model. I sell a jib kit for it  Keep up the building Jason
Nikl Scale Models nikl scale models shapeways store
|
|
Rank: Advanced Member
Groups: Member
Joined: 8/11/2016
Posts: 200
Location: Orlando, FL
|
Marty K wrote:You would have to be happy with that as an end result , job done !
Thats a fairly small piece your working with , but for something a bit larger would starting with a bit of rod rather than tube be viable ?
Drill a hole in one end to suit the thread , file a couple of flats and shape the other end..same end result just a different way to get it done. It probably would Marty. I basically just used what I had and tried to make the part look and function like the original part. In a perfect world I would have preferred a metal part instead of a styrene part, but it is what it is. Take care.
|
|
Rank: Advanced Member
Groups: Member
Joined: 8/11/2016
Posts: 200
Location: Orlando, FL
|
hummer13 wrote:Looks good you have to start somewhere, i have been building for 9 years now nothing beats it but theres not enough time in the day for everything. If you need different style pendant lines i can do the same as the 855 which is a great model. I sell a jib kit for it Keep up the building Jason Jason, I just got a NZG 855 and a 8100 so I know what you mean about the different style pendant lines. As a matter of fact, I really like the NZG pendant lines and think I would just replace all the Conrad lines with that style if I had it all to do over again. But of course I would need to stock up on the wire, crimp beads, crimping tool and wire finalities to be able to do it. I have most of that stuff - but not all yet. I eventually will get there though. BTW, that is an awesome looking jib. I would be interested to know more about your jib kit. Take care.
|
|

Rank: Advanced Member
Groups: Member
Joined: 6/5/2007
Posts: 2,758
Location: Sarasota, Florida, USA
|
hummer13 wrote:Looks good you have to start somewhere, i have been building for 9 years now nothing beats it but theres not enough time in the day for everything. If you need different style pendant lines i can do the same as the 855 which is a great model. I sell a jib kit for it Keep up the building Jason But Jason, your missing a set of shines on that boom head!!! Looking good though, where to you have that jib pendants lined too, the regular boom pendant lines toward the head???
Dain I'm a kid at heart, so I will play with any model construction vehicle from 1:87 scale to 1:1 scale!!!! Age is a state of time NOT a state of mind!!
|
|
Rank: Advanced Member
Groups: Member
Joined: 6/4/2006
Posts: 7,744
Location: arlington, Tx
|
Dain this was a mock up before i had the final pendants, here is the final set up with the pendant lines  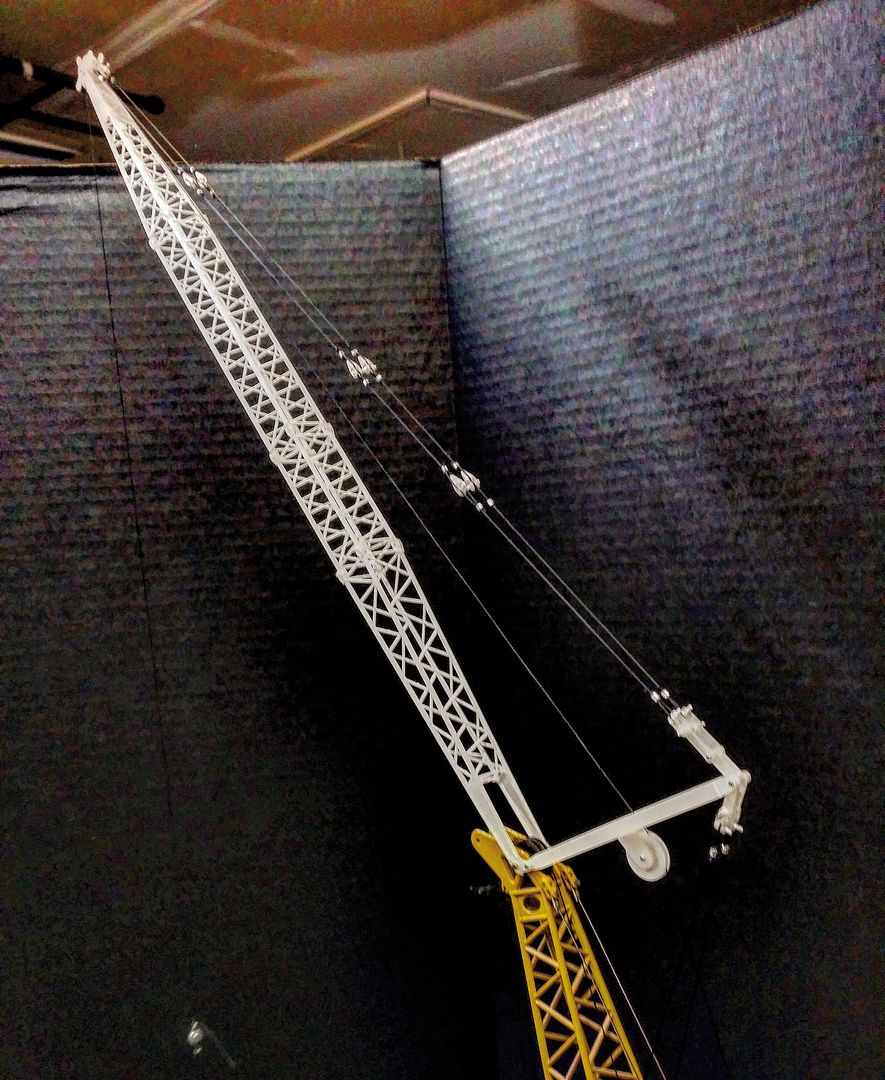 I have a jig to make each line. The kit can be ordered thru my shapeways store but you need to get the pendants from me or do your own.
Nikl Scale Models nikl scale models shapeways store
|
|
Rank: Advanced Member
Groups: Member
Joined: 6/5/2007
Posts: 2,758
Location: Sarasota, Florida, USA
|
hummer13 wrote:Dain this was a mock up before i had the final pendants, here is the final set up with the pendant lines I have a jig to make each line. The kit can be ordered thru my shapeways store but you need to get the pendants from me or do your own. Sweet, pendants for me aren't much of an issue, I make my own. I have made single lines to go from the equalizer to the boom head plus made the separate ones that correspond to the boom segments. I use either fishing line leader or beading wire and jewelry crimp tubes to make my lines and I also have a jig set up for them.
Dain I'm a kid at heart, so I will play with any model construction vehicle from 1:87 scale to 1:1 scale!!!! Age is a state of time NOT a state of mind!!
|
|
|
Guest |
