|
|

Rank: Advanced Member
Groups: Member
Joined: 9/7/2005
Posts: 1,155
Location: Copake, NY
|
My next project will be a crane again. This time an all-terrain crane. This model is actually one of the first all-terrain crane and it set the trend for the future. The LTM1055 was designed by Liebherr for a large order from Russia for a gigantic natural gas pipeline project in the early 80’s. All together 326 cranes were delivered, mostly of this type. It was a pretty rudimentary design with 8-wheel drive, with conventional springs and only the 2 front axles steering. The crane cab has been adapted so it fits on a train wagon.  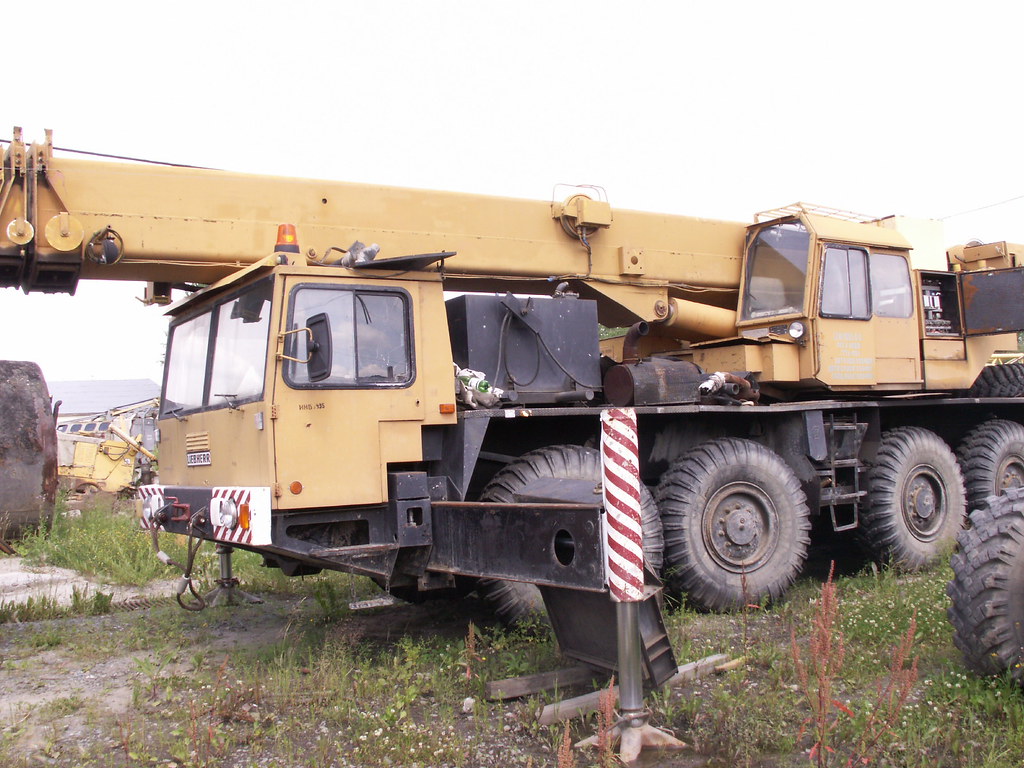  From this design the LTM1060 was developed with all-wheel drive and all-wheel steering and hydraulic suspension. This crane was very popular and led the way to the general acceptance of the all-terrain cranes.  I made a start and this time I started with the outrigger boxes. I made these out of steel, nicely brazed together.  With outrigger boxes done I made a start with carrier frame. I chose ¼“ AL. This will give a lot of strength to the frame and is easy to work with. 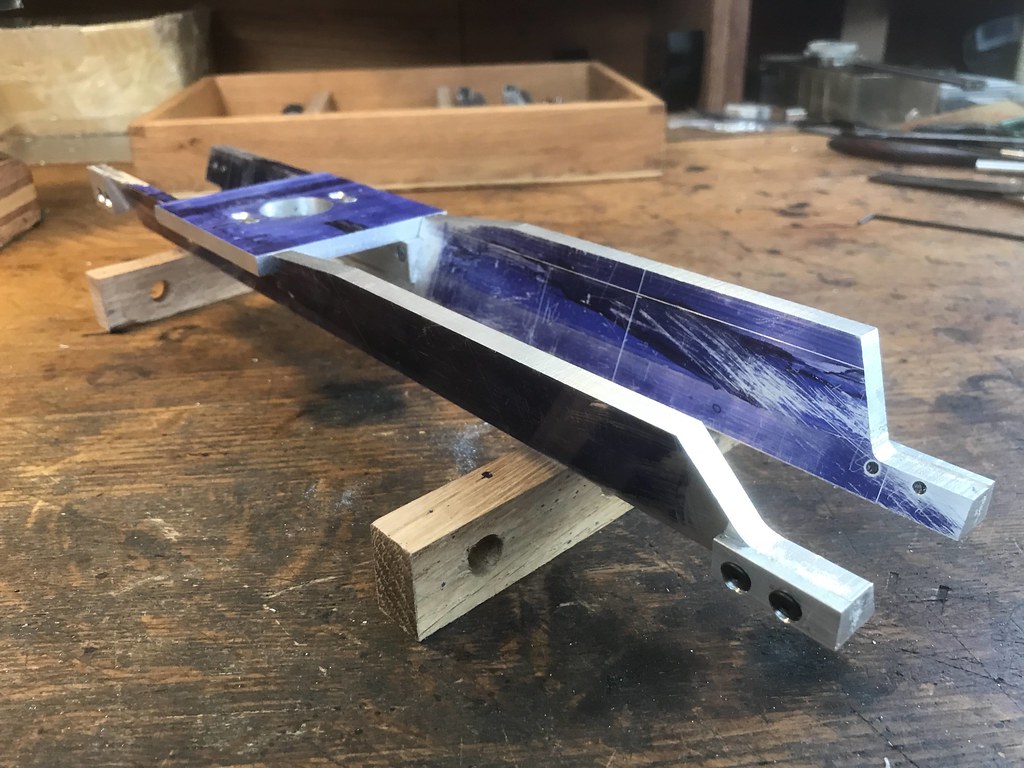 Kerst
 http://forums.dhsdiecast.com/default.aspx?g=posts&m=1096251 http://forums.dhsdiecast.com/default.aspx?g=posts&m=1096251
|
|

Rank: Advanced Member
Groups: Member
Joined: 1/11/2007
Posts: 9,080
Location: Lincolnshire
|
I look forward to what will be another amazing build!
Paul R
|
|
Rank: Advanced Member
Groups: Member
Joined: 9/7/2005
Posts: 1,155
Location: Copake, NY
|
During the past months I worked on the axles. All 4 are driven and there is limited space, so I need to design them carefully. I started with one axle to make sure it fits and in order to try things out. Now I think I am ready to make the other 3 axles. The basis is a block of AL.  The diff is a Traxxas 1/16 VXL E-revo. It is not too big and looks pretty sturdy.  here the axle is taking shape: 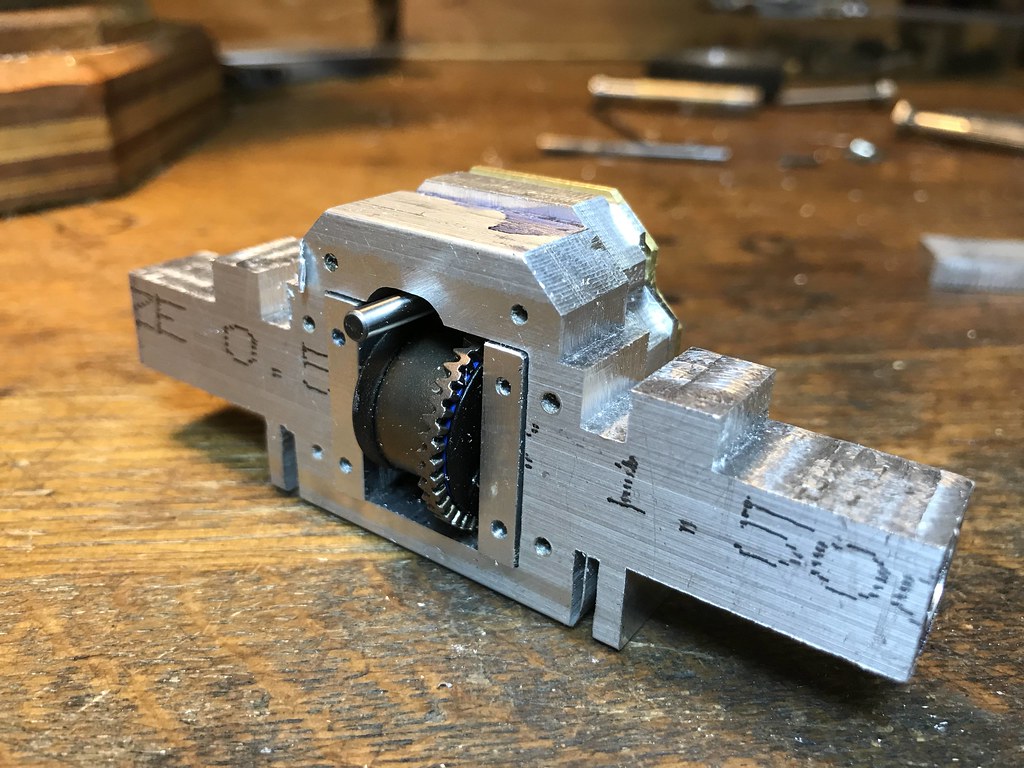  And here with the wheels:  Kerst
http://forums.dhsdiecast.com/default.aspx?g=posts&m=1096251
|
|

Rank: Advanced Member
Groups: Member
Joined: 6/27/2013
Posts: 937
Location: Quebec, Canada,
|
Looks great Kerst. I am always curious to see your posts every time they are updated. For some reason, I really like your avatar picture. You will figure out why soon  Stef
___________________________________________________ Playing with toys since 1970, now building them.
|
|
Rank: Advanced Member
Groups: Member
Joined: 9/7/2005
Posts: 1,155
Location: Copake, NY
|
I still have a stack of tires, which I used for other truck cranes, like the Liebherr LTM1800 and they would be the right size for the LTM1055, but they are not perfect. This off-road crane needs off-road tires, so I have been searching the Internet for a while, but didn’t find anything. Last week I was clearing up some drawers and found some nice tires and when I measured them, they proved to be perfect for the LTM1055! In the early 80’s I bought this Conrad model of a Wabco Haulpack and somehow the tires survived. But I only had 6 of them and I needed 2 more. Luckily, I found a Haulpack for very little money, so now I have 12 tires!  Comparing tires:  Loosely fitted:  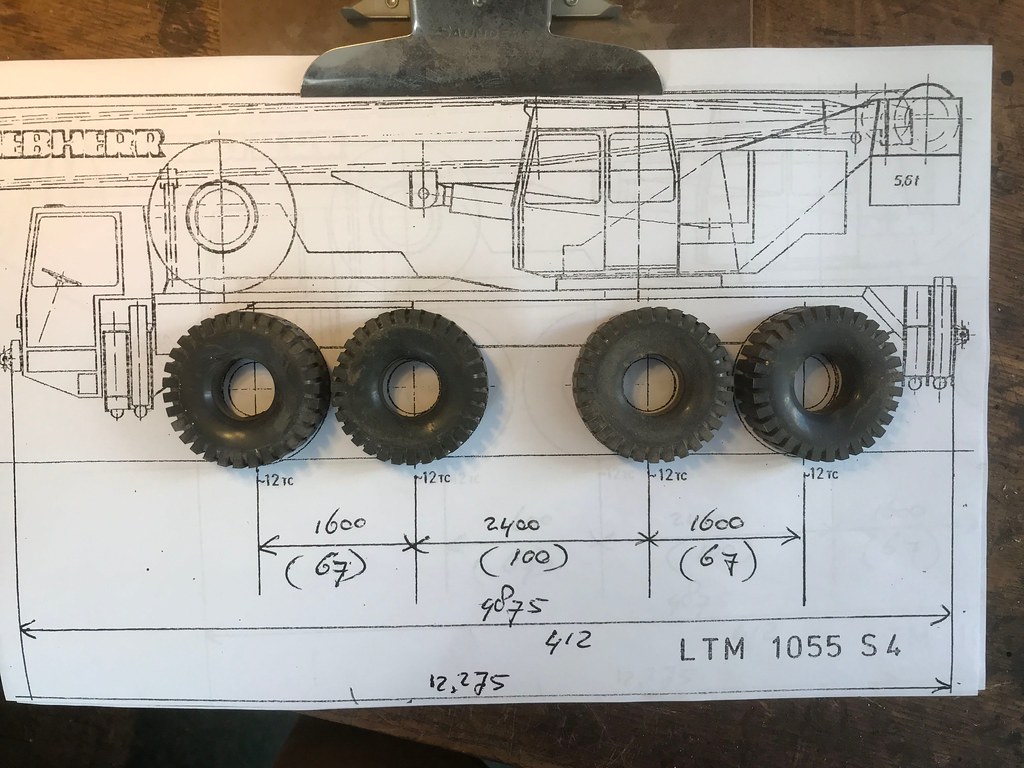 Now I have all the parts for the axles. Kerst
http://forums.dhsdiecast.com/default.aspx?g=posts&m=1096251
|
|
Rank: Advanced Member
Groups: Member
Joined: 9/7/2005
Posts: 1,155
Location: Copake, NY
|
Thank you all! During the past months I have been making the parts for the axles. It's a lot of work, but it is getting there.   Kerst
http://forums.dhsdiecast.com/default.aspx?g=posts&m=1096251
|
|
Rank: Advanced Member
Groups: Member
Joined: 1/11/2007
Posts: 9,080
Location: Lincolnshire
|
That’s amazing!
Paul R
|
|

Rank: Advanced Member
Groups: Member
Joined: 6/18/2003
Posts: 2,251
Location: Charlotte, North Carolina
|
kerst: Are you one of those high-tech robots? Splendid work, great skills. Thanks,CAW
|
|
Rank: Advanced Member
Groups: Member
Joined: 9/7/2005
Posts: 1,155
Location: Copake, NY
|
Quinella wrote:kerst: Are you one of those high-tech robots? Splendid work, great skills. Thanks,CAW Not really. One third of the parts I make I mess up. I just don't give up till I am happy with the result. Thanks for the compliments!, Kerst
http://forums.dhsdiecast.com/default.aspx?g=posts&m=1096251
|
|
Rank: Advanced Member
Groups: Member
Joined: 6/14/2007
Posts: 982
Location: Eureka
|
Looks great Kerst. That's a lot of machining.
How will you do the hydraulic boom cylinder?
Robert
|
|
Rank: Advanced Member
Groups: Member
Joined: 9/7/2005
Posts: 1,155
Location: Copake, NY
|
I have been working on the axles and the suspension. The original LTM 1055 S4 had the old fashioned Liebherr suspension with coil springs. Only later they introduced the hydraulic suspension. The third axle also has the transfer box incorporated.  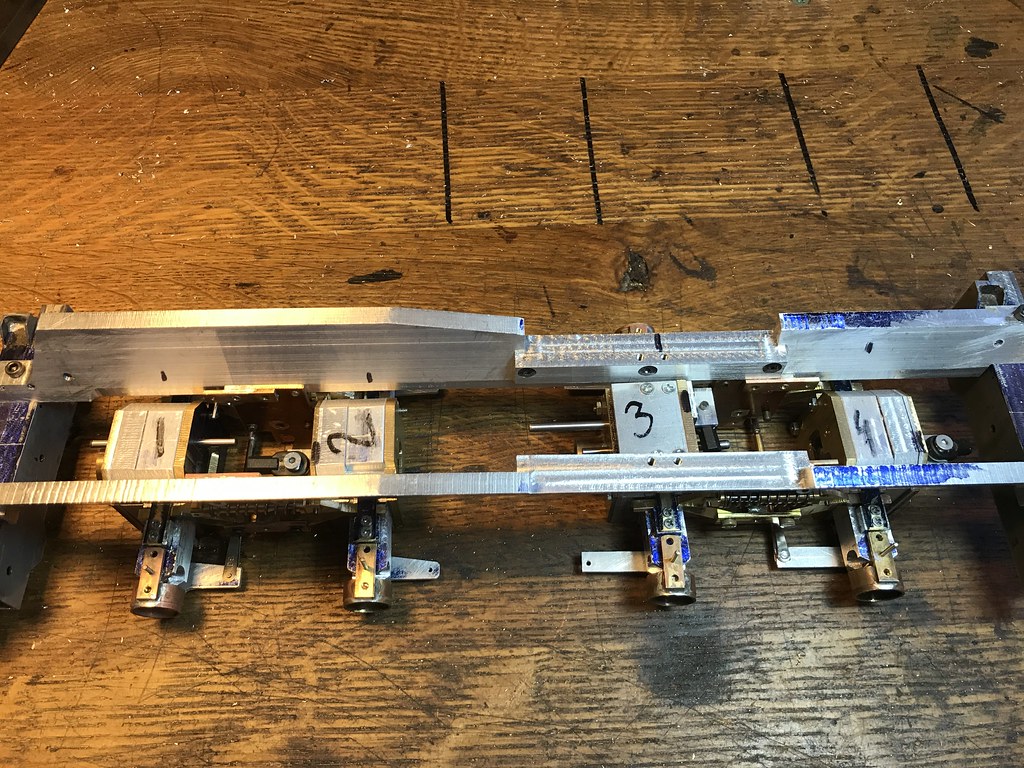 I made most of the parts for the axles, but I first wanted to get the suspension done before finishing them. It is quite tight and needs a bit of figuring to make it all work. Kerst
http://forums.dhsdiecast.com/default.aspx?g=posts&m=1096251
|
|
Rank: Advanced Member
Groups: Member
Joined: 9/7/2005
Posts: 1,155
Location: Copake, NY
|
Finally something to show. With all the rain this weekend I had plenty of time to finish the wheels and fit the tires. 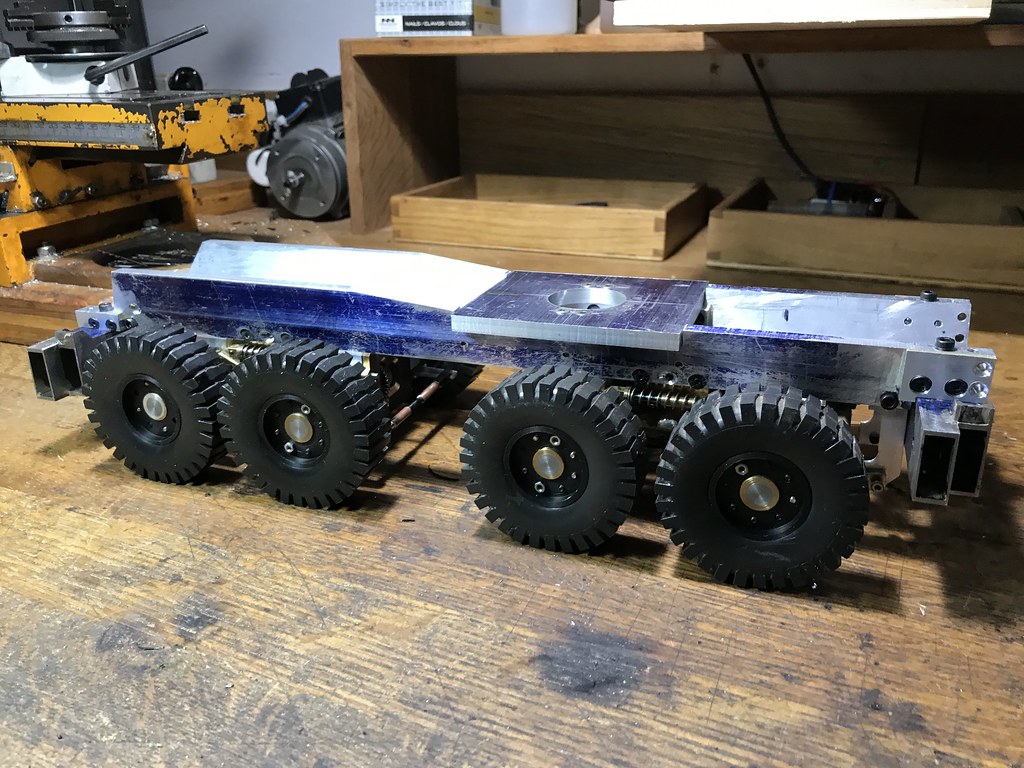  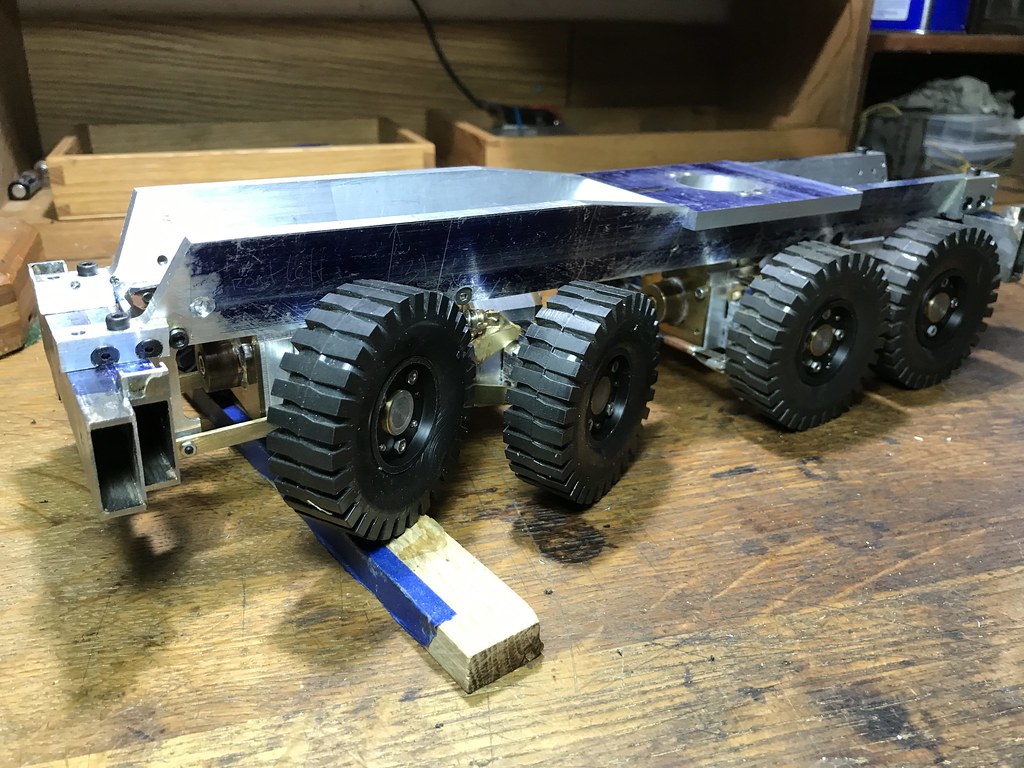 The axles are basically done, just lots of finishing and fitting. Then I can add the drive shafts. Then the steering. Kerst
http://forums.dhsdiecast.com/default.aspx?g=posts&m=1096251
|
|

Rank: Advanced Member
Groups: Member
Joined: 6/5/2007
Posts: 2,774
Location: Sarasota, Florida, USA
|
Awesome work so far Kerst!!! I love seeing your work!!!
Dain
I'm a kid at heart, so I will play with any model construction vehicle from 1:87 scale to 1:1 scale!!!!
Age is a state of time NOT a state of mind!!
|
|
Rank: Advanced Member
Groups: Member
Joined: 6/27/2013
Posts: 937
Location: Quebec, Canada,
|
" needs a bit of figuring to make it all work." LOL!  S
___________________________________________________ Playing with toys since 1970, now building them.
|
|
Rank: Advanced Member
Groups: Member
Joined: 9/7/2005
Posts: 1,155
Location: Copake, NY
|
More than a month later and not much obvious progress, at least non visibly. I got all the gears in the axles to turn smoothly, the suspension works well and I got the steerage linkage figured out. This was quite something with the limited space available. This morning I mounted the servo and I am debating how to connected the rear axles, either with a separate servo or with a special linkage. Stay tuned!  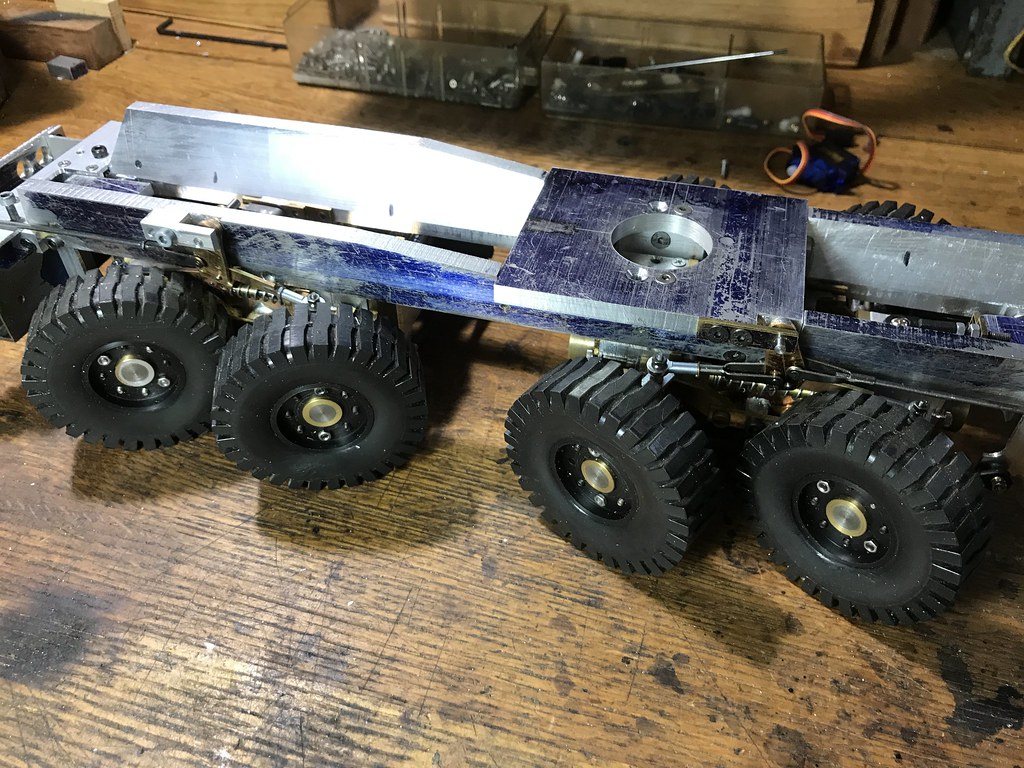  Kerst
http://forums.dhsdiecast.com/default.aspx?g=posts&m=1096251
|
|

Rank: Advanced Member
Groups: Member
Joined: 3/17/2006
Posts: 1,169
Location: NJ
|

We rally round the family, with a pocket full of shells.....
|
|

Rank: Advanced Member
Groups: Member
Joined: 1/28/2005
Posts: 198
Location: Vancouver, WA
|
Amazing!!!!
|
|
Rank: Advanced Member
Groups: Member
Joined: 9/7/2005
Posts: 1,155
Location: Copake, NY
|
It has been a while since my last update. With the cold winter and Covid19 cabin fever has been real and I spent quite a bit of time in the work shop. Apart from a lot of little improvements I managed to build a gearbox with 4 speeds, which fits in the allotted space. And I even found space for the mini servos to control them. The outlines of the cab are also there. I used steel and brazed it together and fill it in with AL. there is still a lot to do, but i wait till all the components are in place before I finish the cab. Now it is time to get all the RC equipment to work and to make the slewing ring.    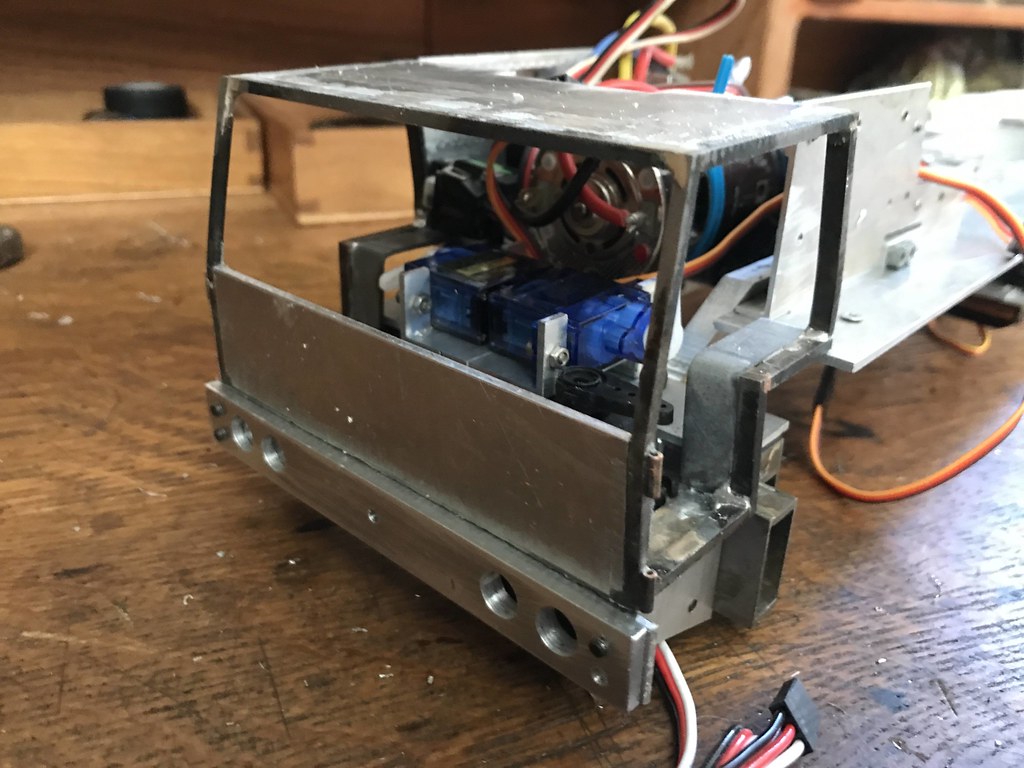  Kerst
http://forums.dhsdiecast.com/default.aspx?g=posts&m=1096251
|
|
Rank: Advanced Member
Groups: Member
Joined: 1/11/2007
Posts: 9,080
Location: Lincolnshire
|
That is incredible!!
Your craftmanship and skill just amazes me. What do you do for a day job?
Paul R
|
|
Rank: Advanced Member
Groups: Member
Joined: 9/7/2005
Posts: 1,155
Location: Copake, NY
|
I got the steering for the rear axles to work. I use a micro servo, which fits nicely in the limited space available. This one is quite strong and i had to make a steel bracket to create the necessary stiffness. It works nicely. I will buy a similar one for the front steering.  Kerst
http://forums.dhsdiecast.com/default.aspx?g=posts&m=1096251
|
|
|
Guest |
