|
|
Rank: Advanced Member
Groups: Member
Joined: 7/6/2015
Posts: 1,317
|
frusso your work on your equipment carries over to your trucks, very nice. How about sharing some information on the tow behind vibratory roller. I’m afraid to ask, but is that a kit or did you build that from scratch also.
Thanks Steve
|
|

Rank: Advanced Member
Groups: Member
Joined: 9/22/2003
Posts: 876
Location: Brasil
|
Exkvate3140 wrote:frusso your work on your equipment carries over to your trucks, very nice. How about sharing some information on the tow behind vibratory roller. I’m afraid to ask, but is that a kit or did you build that from scratch also.
Thanks Steve Steve, this tow roller is a full scratch model. I've done on past using alternaive materials. After this one I develop another model. Now a friend is working in a kit from the same model and will be really nice!!! The next model to be posted here will be this roller!
|
|
Rank: Advanced Member
Groups: Member
Joined: 7/6/2015
Posts: 1,317
|
frusso that roller is one beautiful scratch built model with better detail than the one I have from EMD. That would make a great kit.
Thanks for the response and great work.
Steve
|
|

Rank: Advanced Member
Groups: Member
Joined: 9/22/2003
Posts: 876
Location: Brasil
|
Exkvate3140 wrote:frusso that roller is one beautiful scratch built model with better detail than the one I have from EMD. That would make a great kit.
Thanks for the response and great work.
Steve Thank you Steve. We are working in some kits from town rollers. We will do two different sheep foots rollers and two different vibratories. Here go more pics from the two tipes of vibratories. It is not the kit yet. 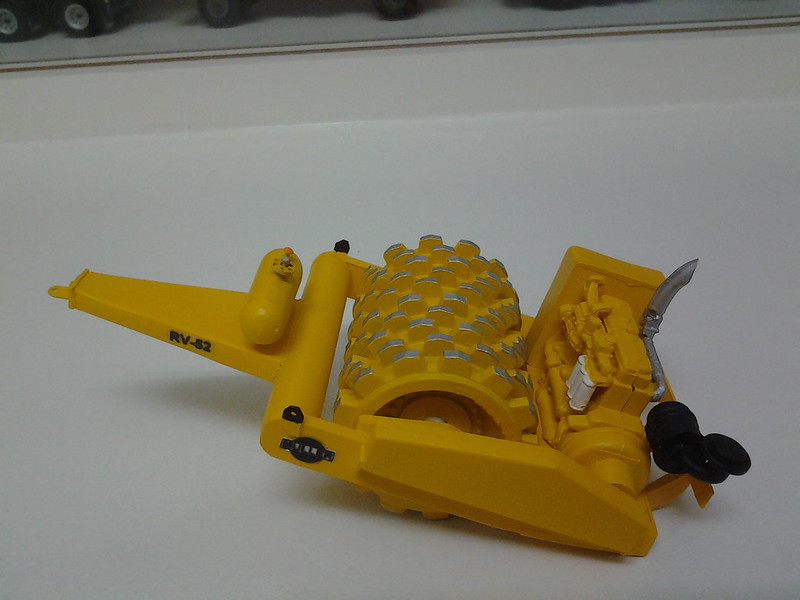 20150525_181646 20150525_181646 by Felipe Russo, no Flickr 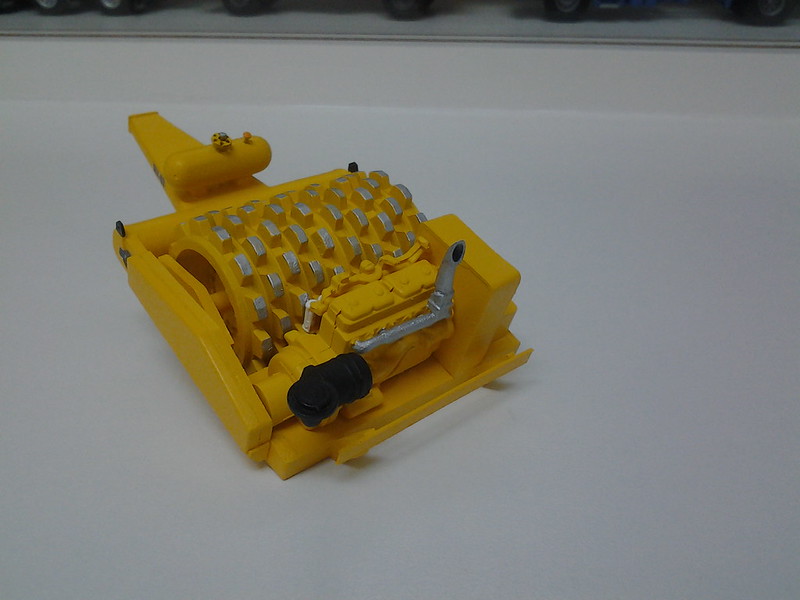 20150525_181653 20150525_181653 by Felipe Russo, no Flickr 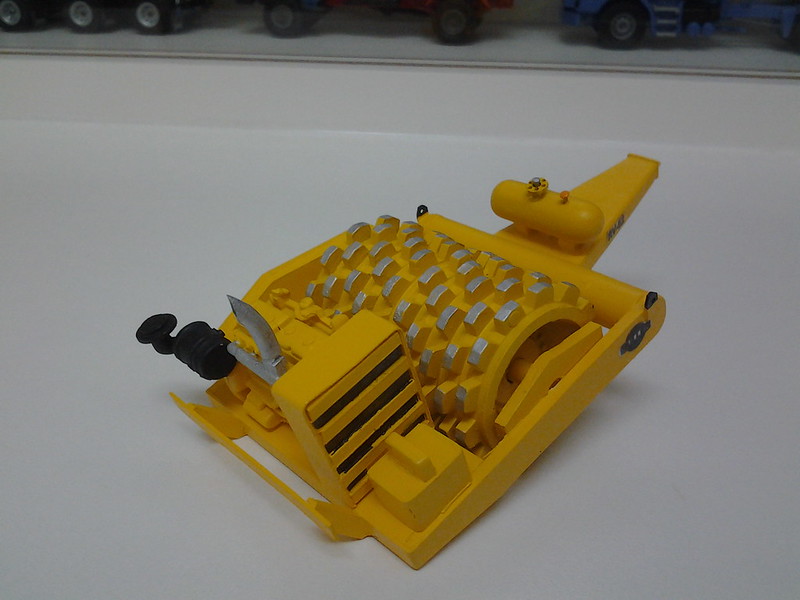 20150525_181658 20150525_181658 by Felipe Russo, no Flickr 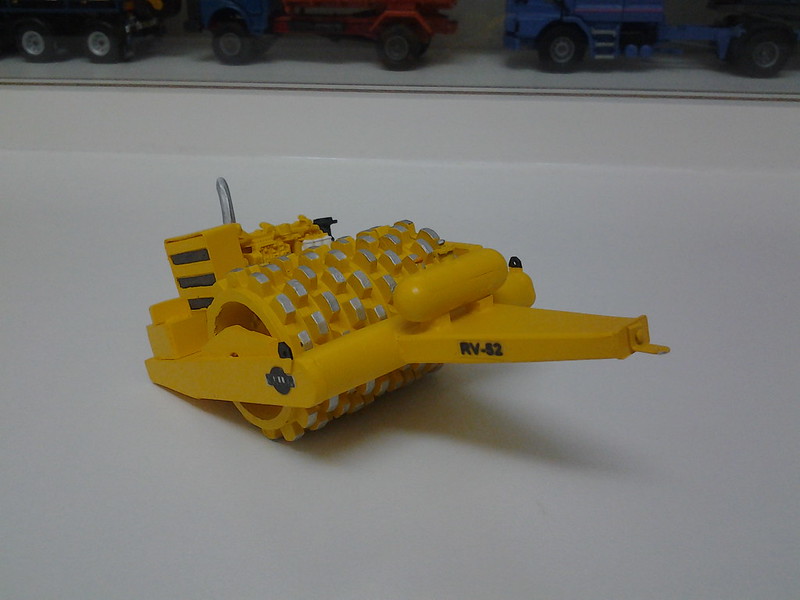 20150525_181705 20150525_181705 by Felipe Russo, no Flickr 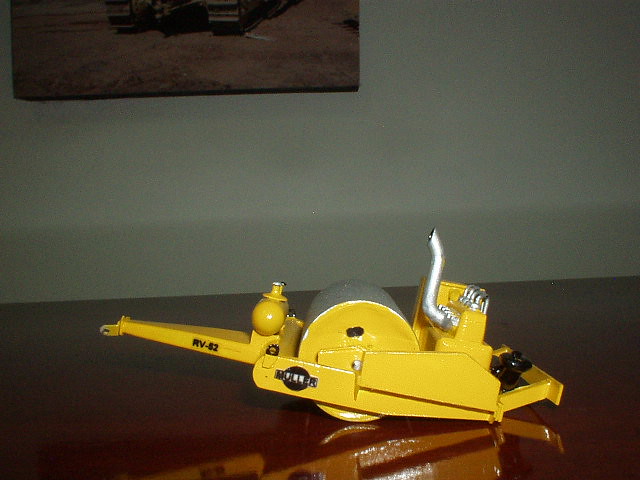 Muller RV52 001 Muller RV52 001 by Felipe Russo, no Flickr 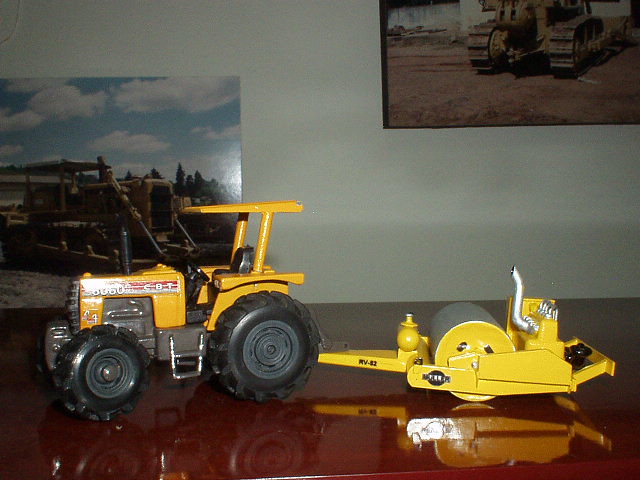 Muller RV-52 001 Muller RV-52 001 by Felipe Russo, no Flickr 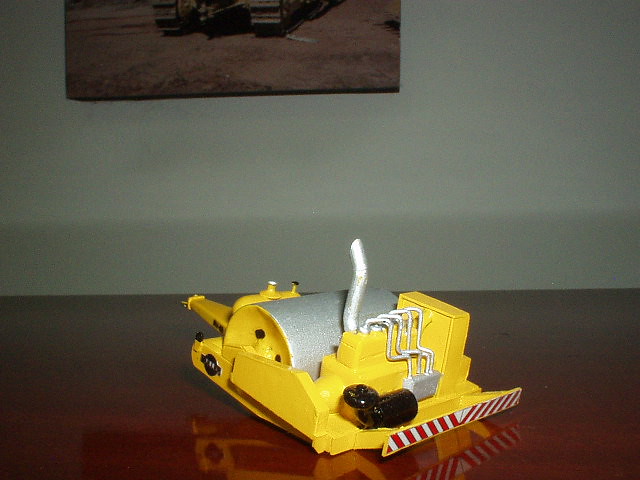 Muller RV52 002 Muller RV52 002 by Felipe Russo, no Flickr 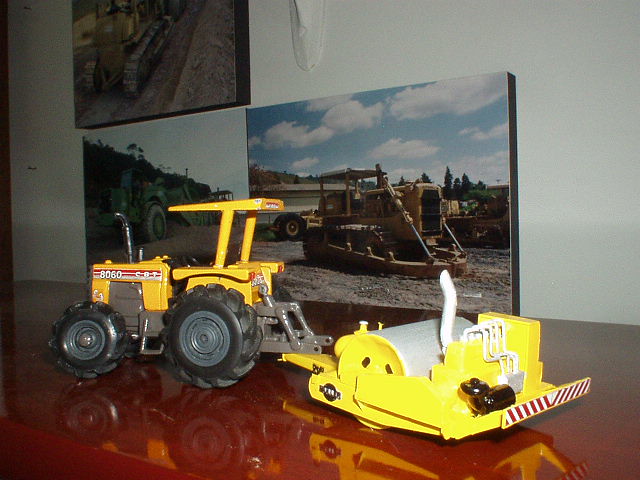 Muller RV-52 002 Muller RV-52 002 by Felipe Russo, no Flickr 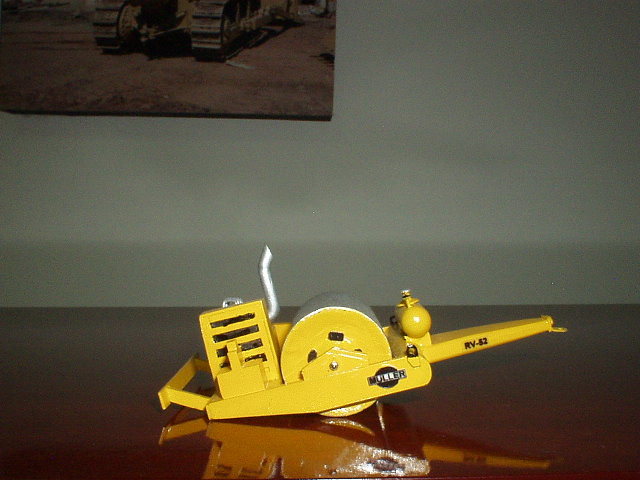 Muller RV52 003 Muller RV52 003 by Felipe Russo, no Flickr 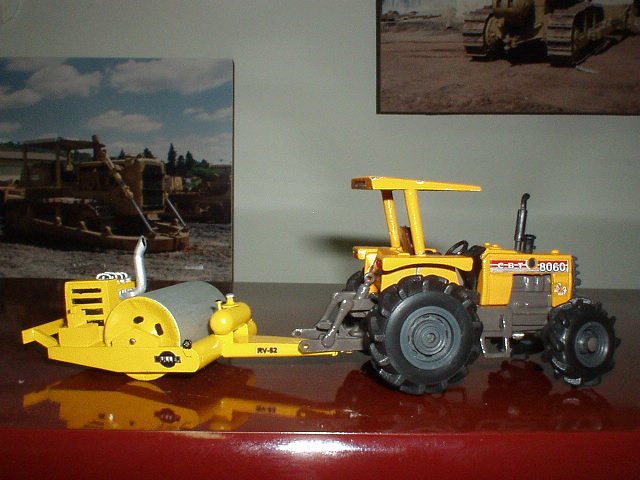 Muller RV-52 003 Muller RV-52 003 by Felipe Russo, no Flickr
|
|

Rank: Advanced Member
Groups: Member
Joined: 6/18/2003
Posts: 2,180
Location: Charlotte, North Carolina
|
Frusso, those are terrific. I want the sheepsfoot. Go ahead and send it up North!!!! Great job. Craig
|
|
Rank: Advanced Member
Groups: Member
Joined: 7/6/2015
Posts: 1,317
|
Felipe both of those vibratory rollers look great, they will look good being towed behind the First Gear International TD-15.
Also don’t send those to Quinella because he will hook them on the back of his Cat D-11. Make the stipulation that he buy 2 TD-15s from Chuck, and show you pictures of them in his 50 acre yard before you mail him anything. He is not a full fledged “dirt guy” yet, but he is getting close and I will keep you updated.
Steve
|
|

Rank: Advanced Member
Groups: Member
Joined: 6/18/2003
Posts: 2,180
Location: Charlotte, North Carolina
|
Oh I thought you used the vibratory rollers to shake the ground to get the worms to come to the surface, so you could go fishing. Bet you never considered how many worms you kill every day Exkvate.!!!!!
|
|
Rank: Advanced Member
Groups: Member
Joined: 7/6/2015
Posts: 1,317
|
Quinella you were making good progress at being a dirt guy, but now you are going the wrong way again. I can now see you trying to hook one of those rollers to the back of your Freightliner while trying to follow a paving crew. You better resume going to those meetings once a week and contact your sponsor. Remember your line, “my name is Craig and I am a dirt guy”.
Steve
|
|

Rank: Advanced Member
Groups: Member
Joined: 9/22/2003
Posts: 876
Location: Brasil
|
I hope to show photos of the prototype soon!!!
We will do two versions of sheepfoots rollers plus two versions of vibrator rollers.
|
|

Rank: Advanced Member
Groups: Member
Joined: 9/22/2003
Posts: 876
Location: Brasil
|
|
|
Rank: Advanced Member
Groups: Member
Joined: 7/14/2008
Posts: 247
Location: Germany, CE
|
She looks fantastic, Felipe!
What a job. I really like the hydraulic hoses on the Kelley ripper. What did you use for tracks and sprockets? I don't know if it fits you modelling style, but have you ever thought about using a black wash on your models? Regarding the engine side panels, you can improve the look of the perforated areas a lot. I use black oil paint and lighter gas.
There is a member of Heavy Equipment Forums called Surfer-Joe who has quite some experience regarding Fiat-Allis machines. If my memory serves me right, he told once the story of 657s being pushed by one or two D9s. Was hard going, don't remeber what stuff was loaded. But the decision was made to bring a 41 into the cut to improve loading - then it happened: The 41 with all her grunt snapped the bolts of the cutting edge of the big scraper.
Nice tractor, nice model - keep it rolling!
Max
|
|
Rank: Advanced Member
Groups: Member
Joined: 7/6/2015
Posts: 1,317
|
frusso as usual an outstanding model the pusher blade looks great along with the ripper. Operators station is right on point, and the grab rails add so much realism to the whole model along with the sprockets, metal tracks and hydraulic lines. The grill also looks fabulous. Did you start it yet?
I’m surprised Quinella has not responded yet, but I figure he is at the bank withdrawing cash for an offer, remember he can’t say no so just keep raising the price on him.
Great job on the build. What’s next?
Steve
|
|
Rank: Advanced Member
Groups: Member
Joined: 7/14/2008
Posts: 247
Location: Germany, CE
|
Hi mates, found a 41-B slideshow on youtube. Hi-resolution scan, a bunch of details about this classic tractor 1974 Fiat Allis 41-B Crawler Tractor Dealers Brochure SlideshowHave fun! Max
|
|

Rank: Advanced Member
Groups: Member
Joined: 9/22/2003
Posts: 876
Location: Brasil
|
Mr. Scholz wrote:She looks fantastic, Felipe!
What a job. I really like the hydraulic hoses on the Kelley ripper. What did you use for tracks and sprockets? I don't know if it fits you modelling style, but have you ever thought about using a black wash on your models? Regarding the engine side panels, you can improve the look of the perforated areas a lot. I use black oil paint and lighter gas.
There is a member of Heavy Equipment Forums called Surfer-Joe who has quite some experience regarding Fiat-Allis machines. If my memory serves me right, he told once the story of 657s being pushed by one or two D9s. Was hard going, don't remeber what stuff was loaded. But the decision was made to bring a 41 into the cut to improve loading - then it happened: The 41 with all her grunt snapped the bolts of the cutting edge of the big scraper.
Nice tractor, nice model - keep it rolling!
Max Max, your idea is nice! However I don't know do it well. I tried once and looks ugly. I used the pics from this brochure in youtube to get some datails to made my model. This 41B is too small, Exkvate3140 showed me that this size is correc for a 21 or 31B. I have one HD41 and this 41B looks as a toy in his side!
|
|

Rank: Advanced Member
Groups: Member
Joined: 9/22/2003
Posts: 876
Location: Brasil
|
Friends from Forum.
It was my last modified model. I'll spend a bit to post more pics. However I have some nice models, not made for me but looks nice. Would you like see them?
|
|
Rank: Advanced Member
Groups: Member
Joined: 7/14/2008
Posts: 247
Location: Germany, CE
|
Hi Felipe,
the number and the quality of your custom models is truely amazing. And you kept showing these to us like an unstoppable machine gun! Wow. As for myself, I would look forward to see more of your collection, modified or not.
Regarding the 41-B/31-B question: I think a 31-B is a perfect match as this tractor was meant to be an competitor to the D9. The undercarriage of the 31-B was developped from the one of the 41-B by removing a track roller. So when you remove all 7 track rollers of the Gescha/Conrad 41-B and replace them by 6 larger ones, you should get closer to a 31-B. Then add larger idlers and sprockets (like the size of your HD41) and you should have a good starting point. I don't know if it will work, but that's the way I'd try it.
And regarding washing, enhancing panel contrast: I know two HO scale modellers who build fantastic heavy equipment from scratch, Timo Bachhuber and Walter Altmannshofer. Both told me that they use school water colors for washing/shading. If they dont like the result, they simply remove it with a wet cloth. And if they like it, it's strong enough to remain on the model. Felipe, if you have 1/35 scale military scale modelling magazines available, just have a look what these chaps are doing.
Hope to see more of your models
Max
|
|

Rank: Advanced Member
Groups: Member
Joined: 6/27/2013
Posts: 937
Location: Quebec, Canada,
|
frusso wrote:Mr. Scholz wrote:She looks fantastic, Felipe!
What a job. I really like the hydraulic hoses on the Kelley ripper. What did you use for tracks and sprockets? I don't know if it fits you modelling style, but have you ever thought about using a black wash on your models? Regarding the engine side panels, you can improve the look of the perforated areas a lot. I use black oil paint and lighter gas.
There is a member of Heavy Equipment Forums called Surfer-Joe who has quite some experience regarding Fiat-Allis machines. If my memory serves me right, he told once the story of 657s being pushed by one or two D9s. Was hard going, don't remeber what stuff was loaded. But the decision was made to bring a 41 into the cut to improve loading - then it happened: The 41 with all her grunt snapped the bolts of the cutting edge of the big scraper.
Nice tractor, nice model - keep it rolling!
Max Max, your idea is nice! However I don't know do it well. I tried once and looks ugly. Another way for doing this is just using oil black paint straight on the rough surface (a radiator grille is perfect for this job) then rub the excess*. I do this on HO locos for enhancing details of the side panels and hinges on brass diesels. Use a small brush and apply, then I rub it with paper towel or some cutouts of my wife's old cotton pyjamas. Works just perfect. Don't use a thick towel as i will go messy. The beauty of oil paint is that you can take your time. I use oil based paints for 95% of my work. And if you don't like the result, just clean away with Varsol thinner (but be careful not to put over decals). Don't use gas or paint thinner (lacquer) as it will soften and remove your model's paint. Just apply Varsol on a piece of cloth and rub: don't dip in or wash as it may also softens the paint over time. Awesome models, by the way. They certainly would come alive with adequate weathering. Not all models collectors likes weathering, but those enjoying well weathered models can pay a premium for a rare collector piece made exactly as the 1:1 prototype. * You need to use a matte color (black or other stain color) unless you are expecting to add another layer of matte varnish. I use Testor's Dullcote, but Tamiya and other brands also do fine models varnishes. Apply very thin layers with an airbrush for better results. I no longer do coating with rattel cans as the varnish thinner sometimes alter the paint and you start seeing wrinkles or bubbles in your original paint and need to start over. I learnt the hard way as I re-painted my very first model paint job 5 times before I find the proper way of doing it. It all comes down to experience, and knowing the products you are working with. Simple products can do very well if you have the right dosage (the right paint with the right thinner, and the right ratio; different colors from a same brand can work totally different, due to the composition, solvents proportion, pigments and so). Just like mixing your own custom colors and doing color match, this is all very intuitive and requires several attempts. Once you found, just keep the winning recipe. And remember to use samples first, or hidden parts of your model if you are unsure of the reaction (if you haven't painted the original paint yourself); don't mess-up with your fine dozers (or some CCM ones) the first time. Stephane
___________________________________________________ Playing with toys since 1970, now building them.
|
|

Rank: Advanced Member
Groups: Member
Joined: 9/12/2012
Posts: 485
Location: San Diego, California
|
Frusso, this whole gallery was very motivational and inspiring, you are very talented and it was nice to see some stuff from brands that we typically don't see. I hope it motivates more people to custom build. I'm certainly going into my workshop after I click "post".
|
|

Rank: Advanced Member
Groups: Member
Joined: 9/12/2012
Posts: 485
Location: San Diego, California
|
Oh, and yes on seeing your other models.
|
|
Rank: Advanced Member
Groups: Member
Joined: 7/6/2015
Posts: 1,317
|
Felipe since you started to share your pictures, I now have about 8 models on the workbench waiting for them to get operators stations. I had done one before you started posting. Now that you got me doing customs, my dioramas have taken a back seat.
All of your customs are fantastic and please keep posting your collection, but don’t let posting keep you from the workbench. Also I can not wait to see your machines in dioramas doing work.
Thanks
Steve
|
|
|
Guest |