|
|

Rank: Advanced Member
Groups: Member
Joined: 6/27/2013
Posts: 937
Location: Quebec, Canada,
|
It's been a while, but my wife suggested that I take pictures of this project, so since I was, I thought i'd be a good idea to share... I know some have been there before, but here is my own conversion of this classic: a Mammoet LR1750. I first started with the common upgrades: YCC brass sheaves everywhere, then the walkways, connecting pins and pennant lines. I have also made a few repaints (jib boom, sheaves, motors, ...) and weathered the tracks. The bulk of the conversion involves the following, still a work in progress: - Scratchbuilt operation console (no messing with batteries or 6 channels on the shelves remote: I wanted my own): just good old wire (custom made). Rugged industrial design: stainless casing with metal switches and buttons; - 9 motors plus LEDS - 12Volts layout; - Several upgrades: ball or needle bearings, then stainless steel sheaves rods for decreasing friction to a minimum; - Replacement of all resin parts (sheaves supports, reel drums) with brass scratchbuild ones; - Replacement of all original die cast parts (which would have to be modified for the conversion), with steel parts. The idea is to be able to allow a potential buyer (but it won't be for sale in a near future!) to go back to the original model and put it back in the static original state; - Allows to unplug electrical wires and hide them in a way that the crane remains possible to be displayed in parts as the original model allows for. Console  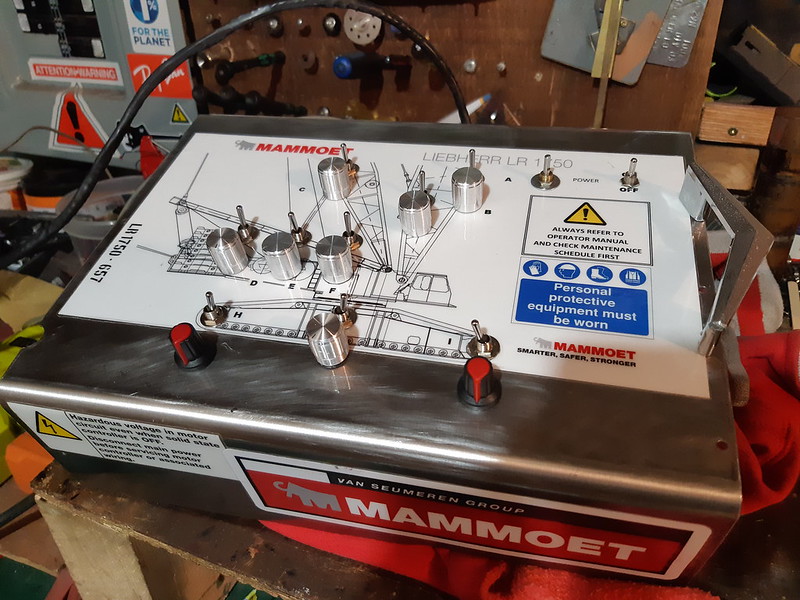 Console commands Console commands by Ironstef70, sur Flickr"/>  Console ends & project parts box Console ends & project parts box by Ironstef70, sur Flickr "/>  broken apart broken apart by Ironstef70, sur Flickr"/>  more works more works by Ironstef70, sur Flickr"/>  Tools handling safety issue Tools handling safety issue by Ironstef70, sur Flickr"/>  Works in progress Works in progress by Ironstef70, sur Flickr"/>  weathered tracks weathered tracks by Ironstef70, sur Flickr"/>  Busy maintenance crew Busy maintenance crew by Ironstef70, sur Flickr"/> 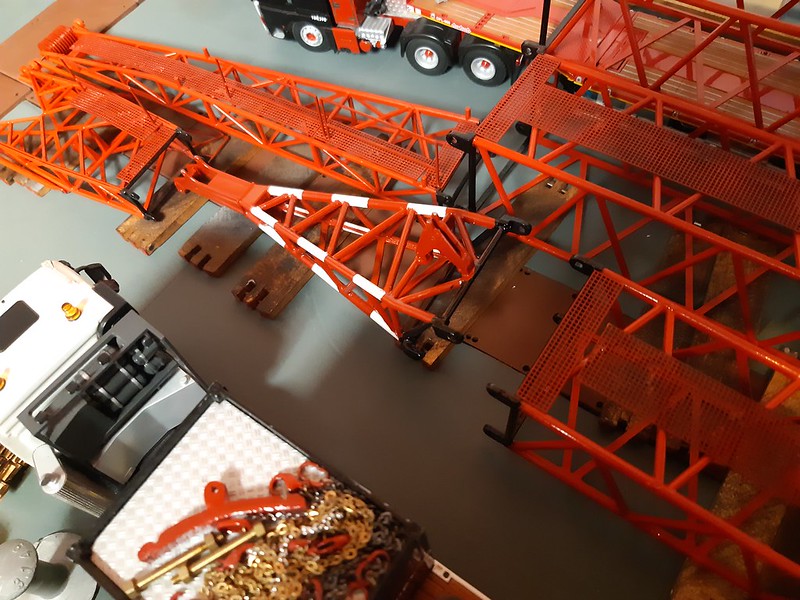 More custom boom works More custom boom works by Ironstef70, sur Flickr"/>  painted brass sheaves painted brass sheaves by Ironstef70, sur Flickr"/> Now, most interesting part: machining and scratchbuilding:  Sans titre Sans titre by Ironstef70, sur Flickr"/> 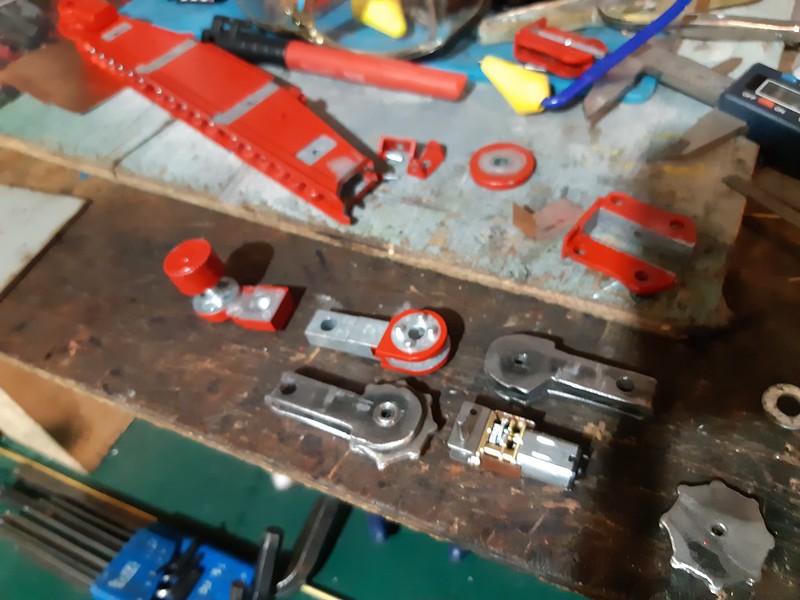 Sans titre Sans titre by Ironstef70, sur Flickr"/> More to come...  Stef
___________________________________________________ Playing with toys since 1970, now building them.
|
|

Rank: Advanced Member
Groups: Member
Joined: 11/11/2006
Posts: 3,421
Location: UK
|
Very interesting! Looking forward to seeing more 
Heavy Cranes
|
|

Rank: Advanced Member
Groups: Member
Joined: 1/11/2007
Posts: 9,080
Location: Lincolnshire
|
Very nice!
Paul R
|
|
Rank: Advanced Member
Groups: Member
Joined: 8/26/2019
Posts: 303
|
wow, that's way above my head...lol... but let me know if you can sell a kit after you've done getting it working...
|
|

Rank: Advanced Member
Groups: Member
Joined: 6/27/2007
Posts: 1,489
Location: St. Louis, Missouri, USA
|
Wow, I hope to see more of this! Thanks for sharing with us, and I wish you lots of success. Is that motor and drivetrain for one of the crawlers? I hope there is plenty of torque coming out of that shaft.
|
|
Rank: Advanced Member
Groups: Member
Joined: 6/27/2013
Posts: 937
Location: Quebec, Canada,
|
wildpig1234 wrote:wow, that's way above my head...lol... but let me know if you can sell a kit after you've done getting it working... ?? Selling a kit?? Geez, I'd have to redo all of these custom parts. Some of them take a whole weekend scratch building. Not mentioning the "test" parts, which were scrapped as I made second or third attempts as they were not up to my satisfaction. Well, If only I could duplicate with a CNC / cast / or else. Problem is I don't use drawings. It's all trial and mistakes, and in my head. Hence why I did not want to alter the original parts. If you wish to know which motors I am using, those are called "N20". These are available in 3, 6 or 12volts and in various ranges of RPM. I use different ones for different cases, but be sure to also use controllers. But custom parts alone are not the only challenge, even if I could sell them as kit. I'd say it's also a matter of installation and minor alterations to the model still must me achieved (like holes for running wires, among few). But yes, indeed the last picture are track motors. These motors are amazing. One of the two tracks ended up blocking on the frame (must do some filing) so I only activated the second one. It was able to drive in circle with a 10 lbs iron block over the undercarriage... Not sure I'd travel across a room with those, but that's not the purpose of course (and it would take an hour!) . Looks promising, though. S
___________________________________________________ Playing with toys since 1970, now building them.
|
|
Rank: Advanced Member
Groups: Member
Joined: 6/27/2013
Posts: 937
Location: Quebec, Canada,
|
Thanks for the kind words. Right now, I am still improving the tracks in order to have them more fluent and consistent speed. It must look like there real one or nothing. I am willing to delete all of this (time and money), then reinstall original parts if it is not the way I wish it shall be. But I am a persistent type of individual. And I have no time frames.  Kerst, for example, takes several years achieving his own projects. I'm not a fraction of his talent, but's that's how I see things. S
___________________________________________________ Playing with toys since 1970, now building them.
|
|
Rank: Advanced Member
Groups: Member
Joined: 6/27/2013
Posts: 937
Location: Quebec, Canada,
|
As you will seen these small motors are amazingly strong for the size. And tough. I had to rebuild one shaft due to abusive hammering as I reinstalled in another position on the end of the transmission, for mirroring the other track. Half a day lost in the process, but least I have learnt how to make replacement shafts for these small motors. Problem is it is difficult to find some with longer shafts. Still, I believe this is on a good start. Following this video, I even made supplemental adjustments (polished away the paint on the sprockets, and added lubricant). They are functioning even better since. The video shows how it is possible to run in prototype speed, thanks to independent controllers. At the end of the video, I run only one track at max speed, showing how strong these are, event topped with a 7-8 lbs piece of iron. https://www.youtube.com/watch?v=d4GjrTJmtjU broken worm gear shaft broken worm gear shaft by Ironstef70, sur Flickr "/>   Rebuilt shaft Rebuilt shaft by Ironstef70, sur Flickr Looks like my maintenance manager has approved the test. Moving forward ...  Moving on! Moving on! by Ironstef70, sur Flickr"/>
___________________________________________________ Playing with toys since 1970, now building them.
|
|
Rank: Advanced Member
Groups: Member
Joined: 6/27/2007
Posts: 1,489
Location: St. Louis, Missouri, USA
|
Fantastic! Those little motors are impressive. I'm really enjoying your work on this project. Please keep sharing. I hope that the maintenance manager has a lot more to be happy about, over the coming weeks.
|
|

Rank: Advanced Member
Groups: Member
Joined: 10/4/2005
Posts: 990
Location: england
|
Thumbs up!Green light,for completion!  Those tracks look real nice.
|
|
Rank: Advanced Member
Groups: Member
Joined: 6/27/2013
Posts: 937
Location: Quebec, Canada,
|
Thanks. I also enjoy myself doing this. I am also planning to add more YCC details to the crane, such as etched metal data for the counterweights, more metal pennant lines, 1.5 M tracks, metal Liebherr boom logos and such. I wish to make her be one of a kind once completed. I better not count all parts and time invested...  Stef
___________________________________________________ Playing with toys since 1970, now building them.
|
|
Rank: Advanced Member
Groups: Member
Joined: 12/13/2005
Posts: 1,321
Location: Latrobe,Pa.
|
Very nice work, impressive. Is there a specific co. you buy components from? There must be hundreds of choices. The console would be hard for me to design. I've never done electronics designing. Might be a nice challenge.
|
|
Rank: Advanced Member
Groups: Member
Joined: 6/27/2013
Posts: 937
Location: Quebec, Canada,
|
SDBOB wrote:Very nice work, impressive. Is there a specific co. you buy components from? There must be hundreds of choices. The console would be hard for me to design. I've never done electronics designing. Might be a nice challenge.
Thanks. In fact, many parts were purchased on Aliexpress, but I also took many at a local electronic shop in town. It sure is a challenge for several areas, but the console is mostly an electrical layout challenge. I purchased the controllers inline, and got assistance from a friend who assisted me in the choice of the components. But I must say this is nothing to compare with wiring and decoders installation in HO scale locomotives. 1:50 is bigger and not programming at all in this project. But I also like to recycle and reuse what I already have at home. For example, the nice sheet of stainless for the console box was remnant parts from a former espresso machine. Then some gears I am about to use in the pivot were parts I kept from broken power tools (actually a DeWalt disk grinder in this case). The gears will be more than strong enough as you will see shortly.
___________________________________________________ Playing with toys since 1970, now building them.
|
|
Rank: Advanced Member
Groups: Member
Joined: 12/13/2005
Posts: 1,321
Location: Latrobe,Pa.
|
Thank you. I have a o gauge train collection. MTH LIONEL with handheld controllers.
|
|
Rank: Advanced Member
Groups: Member
Joined: 12/13/2005
Posts: 1,321
Location: Latrobe,Pa.
|
I have boxes for old springs, gears,bearings etc you never know when you need 'something'.
|
|
Rank: Advanced Member
Groups: Member
Joined: 8/26/2019
Posts: 303
|
Seems like it's easier if there could be a kit made by conrad or nzg with the base of the crane body and the boom foot being manufactured from scratch with motors in the factory...... doing an after conversion seems way more complicated....lol.... Just wish that model crane manufacturers consider doing these....
|
|

Rank: Advanced Member
Groups: Member
Joined: 9/12/2012
Posts: 485
Location: San Diego, California
|
Holy cow, this is quite the task, I'm excited to see it in action.
|
|
Rank: Advanced Member
Groups: Member
Joined: 6/27/2013
Posts: 937
Location: Quebec, Canada,
|
wildpig1234 wrote:Seems like it's easier if there could be a kit made by conrad or nzg with the base of the crane body and the boom foot being manufactured from scratch with motors in the factory...... doing an after conversion seems way more complicated....lol.... Just wish that model crane manufacturers consider doing these.... Hmm yes, but I also wonder why don't they just design them with the operating customer in mind already? Simply adding a couple bearings, motors and wiring during manufacturing would be much easier than doing all these modifications. They could even install the N20 micro motors already, and it would be simply up to the customer to purchase a 6 chanels remote control if desired. It would be worth the extra 500$ or so for the extra manufacturing in my mind.
___________________________________________________ Playing with toys since 1970, now building them.
|
|
Rank: Advanced Member
Groups: Member
Joined: 6/27/2013
Posts: 937
Location: Quebec, Canada,
|
More works this weekend. I've already prepared the brass/copper reel drums a couple weeks ago, but a friend is having the opposite end flanges, and drum frames CNC machined. I've been working on the booms details and tracks since. Yesterday, I have completed the "hydraulic" layout and validated that is runs through, which it did. Might look odd at this point, but the challenge is also to make sure all of this is still serviceable once assembled. I also need to figure out plenty of details such as critical areas of concerns (wires rubbing on sharp edges and cut over time, having sufficient length for opening the base, and such...). For those wondering, this is the grinder gear I previously mentioned about. the pivot has needle bearings at each ends. I had to solder 4 layers of pipes as sleeves for fitting the sprocket on the smaller pipe and lots of precision grinding for thinning the latter. Now I am waiting for the mail man for some missing parts, including the motor I wish to put in here. The design of this is pretty much what have been causing the insomnia recently    reel drums fit reel drums fit by Ironstef70, sur Flickr"/>  Nervous system Nervous system by Ironstef70, sur Flickr"/>  Fancy DeWalt sprocket Fancy DeWalt sprocket by Ironstef70, sur Flickr"/>  need a motor... need a motor... by Ironstef70, sur Flickr"/>  Hide them wires! Hide them wires! by Ironstef70, sur Flickr"/> Stef
___________________________________________________ Playing with toys since 1970, now building them.
|
|
Rank: Advanced Member
Groups: Member
Joined: 6/27/2007
Posts: 1,489
Location: St. Louis, Missouri, USA
|
In the "hide the wires" picture I love how the dude is just sitting in the detached cab. Probably playing with the controls, making motor sounds with his mouth.
|
|
|
Guest |
