|
|

Rank: Advanced Member
Groups: Member
Joined: 10/4/2005
Posts: 990
Location: england
|
Oh my days.  That would be so good,in my LR 1750.I would love,to be able to do that.
|
|

Rank: Advanced Member
Groups: Member
Joined: 6/27/2013
Posts: 937
Location: Quebec, Canada,
|
Guys, if you think that this project is impressive, that's just like a cat being compared to a Siberian tiger. This Frenchman almost made me fall from my chair this weekend. He's taken more than 15 years scratchbuilding a LR1400 in brass, in 1:16 scale. We got in touch through YouTube, as he cannot post here. He also does crane conversions, and completed a couple using custom made components in brass. Way more professional than my current mod. He seems to custom build each of his parts. You've gotta take a look at this: The LR1400A couple RC crane conversionsIn operation: Phil's YouTube channel
___________________________________________________ Playing with toys since 1970, now building them.
|
|
Rank: Advanced Member
Groups: Member
Joined: 6/27/2013
Posts: 937
Location: Quebec, Canada,
|
JohnGalt wrote:In the "hide the wires" picture I love how the dude is just sitting in the detached cab. Probably playing with the controls, making motor sounds with his mouth. LOL!! Soon he will be surrounded with hair sized wires as a couple LEDs will be above and next to the cab...
___________________________________________________ Playing with toys since 1970, now building them.
|
|

Rank: Advanced Member
Groups: Member
Joined: 6/27/2007
Posts: 1,489
Location: St. Louis, Missouri, USA
|
That is some serious talent. It blows my mind to think about what humans can do. From a biological perspective, all we really need to do is be able to find food and shelter, and defend ourselves from enemies. Yet, we have been given skills and abilities far beyond what is necessary for those tasks. Thanks for sharing your work, as well as Phil's. There have been some remarkable creations on this forum over the years.
|
|
Rank: Advanced Member
Groups: Member
Joined: 6/27/2013
Posts: 937
Location: Quebec, Canada,
|
Finally completed all boom sheaves with V grooved bearings at critical friction points. Other sheaves are YCC (13mm and another diameter) brass, and original rods have been replaced by custom stainless ones.   V bearing sheave V bearing sheave by Ironstef70, sur Flickr"/> I have recently received the CNC machined parts for the cable drums. Precision machining on these is critical since proper alignment is mandatory for smooth motors operation. Each drum motor is identified according to its position on the crane. Some have different RPM depending of their location. I always do extra parts in case of errors, but those were all successfully made, so I will have three extra drum/motors for the garage (yay!)    Nice CNC machined parts Nice CNC machined parts by Ironstef70, sur Flickr"/>  Drilling template Drilling template by Ironstef70, sur Flickr"/>  Drum frames Drum frames by Ironstef70, sur Flickr"/> Stef
___________________________________________________ Playing with toys since 1970, now building them.
|
|
Rank: Advanced Member
Groups: Member
Joined: 9/17/2012
Posts: 111
|
Hi, here is my lr fully made from brass and fully functional: https://www.youtube.com/watch?v=9X4OYplz6WMhttps://www.youtube.com/watch?v=IGQyHc11lPgbuilding hours of the giant around 1600h
|
|
Rank: Advanced Member
Groups: Member
Joined: 6/27/2007
Posts: 1,489
Location: St. Louis, Missouri, USA
|
Outstanding! Thanks for the links. The model looks and works great.
|
|
Rank: Advanced Member
Groups: Member
Joined: 6/27/2013
Posts: 937
Location: Quebec, Canada,
|
Wow, awesome project Markus That's way more than just adding motors  . Thanks for sharing! In the meantime, I am still progressing with some parts. Reel drum motors are now completed (with spares), and tested. Sorry for the weir picture (#1). Something happened during upload from the phone.  reel drum motors reel drum motors by Ironstef70, sur Flickr"/> 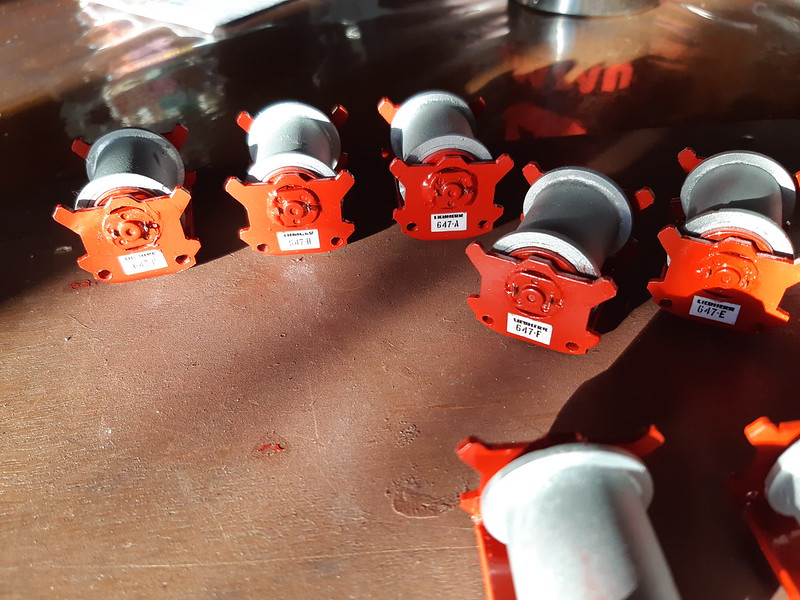 20201030_155902 20201030_155902 by Ironstef70, sur Flickr"/> Stef
___________________________________________________ Playing with toys since 1970, now building them.
|
|
Rank: Advanced Member
Groups: Member
Joined: 6/27/2013
Posts: 937
Location: Quebec, Canada,
|
So I have just finished the control box, now it is ready for testing the motors, including the missing one. It features a huge fan, and I am not worried about dropping it on the floor I wanted it to have an industrial design, but it turns out that it is being overly designed for robustness, considering the environment where it will be used. 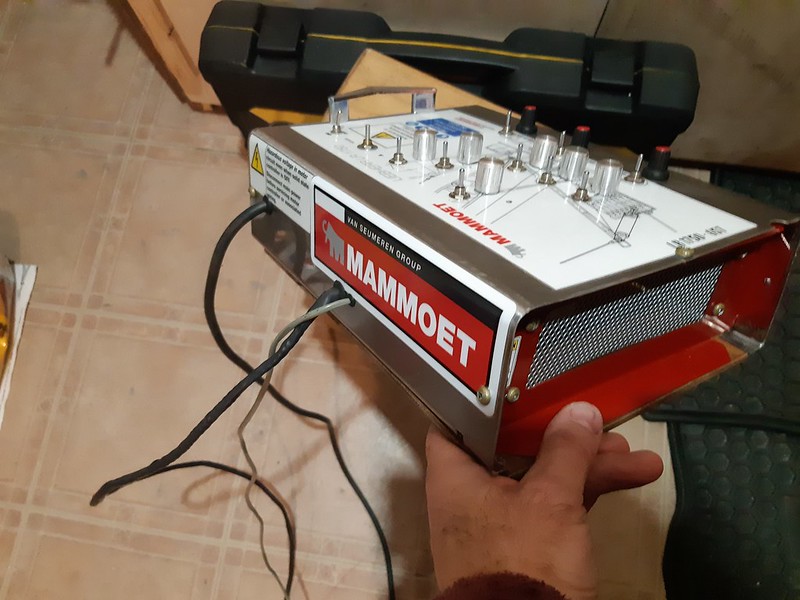 LR1750 Control box LR1750 Control box by Ironstef70, sur Flickr "/>  Finished control box Finished control box by Ironstef70, sur Flickr "/> Then since I am still waiting for parts, I decided to do some rigging equipment in the meantime. Design was inspired by this one, but I purposely made mines beefier (to scale): Dima Mammoet load spreader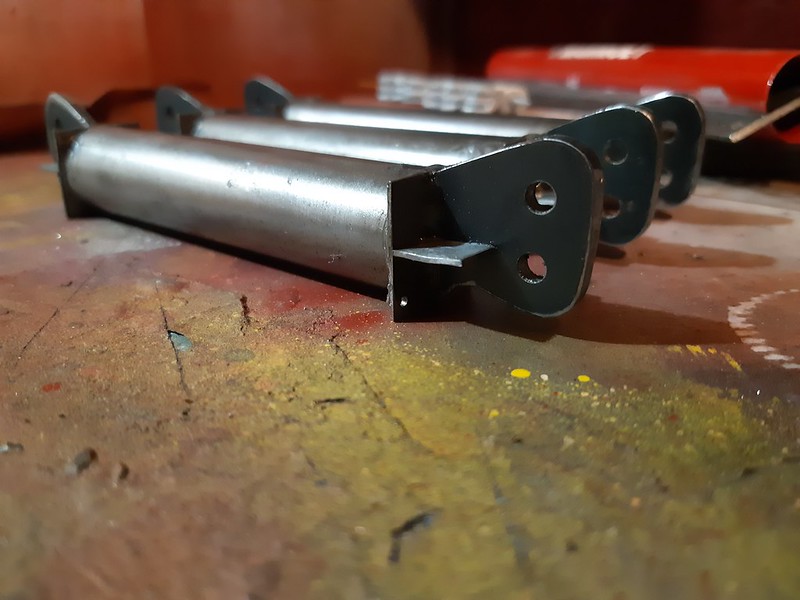 20201106_210020 20201106_210020 by Ironstef70, sur Flickr"/>  20201106_205902 20201106_205902 by Ironstef70, sur Flickr"/>  LS inspection LS inspection by Ironstef70, sur Flickr"/>  Mammoet load spreaders (3) Mammoet load spreaders (3) by Ironstef70, sur Flickr"/>  Mammoet Load spreaders Mammoet Load spreaders by Ironstef70, sur Flickr"/> S
___________________________________________________ Playing with toys since 1970, now building them.
|
|
Rank: Advanced Member
Groups: Member
Joined: 6/27/2013
Posts: 937
Location: Quebec, Canada,
|
Been procrastinating again, but I have finally received the missing parts last Friday. Still I am now considering redesigning the pivot transmission by building a homemade gear box, rather than the current direct drive. I have a 10RPM worm gear motor, and the current gear ratio would split it by 4, but that still feels a bit fast to me. I have solved short circuits issues in the control console. She sits on my new work bench. And almost all drum motors are installed. More pics to come soon.  6 Boom seat & LR console 6 Boom seat & LR console by Ironstef70, sur Flickr "/> Stef
___________________________________________________ Playing with toys since 1970, now building them.
|
|
Rank: Advanced Member
Groups: Member
Joined: 5/11/2009
Posts: 570
|
Looking great - the rigging is very nicely done.
With worm drives do you have any problems with friction, or is the required torque not high enough to cause problems?
|
|
Rank: Advanced Member
Groups: Member
Joined: 6/27/2013
Posts: 937
Location: Quebec, Canada,
|
Davie82 wrote:Looking great - the rigging is very nicely done.
With worm drives do you have any problems with friction, or is the required torque not high enough to cause problems? I haven't tested the pivot yet, but in regard to the tests I have made with the track, I was very impressed. They happen to be noisy a bit, but they sure have enough torque to turn the crane around, especially with needle bearings mount. I just want to make sure I am able to obtain a "prototypical" speed with low RPMs, otherwise, this will look somewhat "toyish". I much prefer realism to fast operation. We're not talking about the average Tonka digger here. These are pricey toys, so I think they deserve the time and attention Besides, thanks for the nice comments. We'll get back to the rigging accessories once the crane is done. They are meant to be used along with some loads I have here. Stef
___________________________________________________ Playing with toys since 1970, now building them.
|
|
Rank: Advanced Member
Groups: Member
Joined: 6/27/2013
Posts: 937
Location: Quebec, Canada,
|
More plastic parts being replaced. The boom drum supports (looking like sleds) are die cast, but I made new brass ones for better fitting with the steel drum frames. I may not redo all plastic parts, but the most critical will be replaced. The gang sheaves support was a mix of steel sheet and brass. I'm glad I was able to solder them together without using any glue.  Sheaves block & boom supports Sheaves block & boom supports by Ironstef70, sur Flickr"/>  Painted Painted by Ironstef70, sur Flickr"/> Next is completing the pivot (securing the motor and transmission), add a few LEDs, then connecting all the wires. Just in time for the holidays... S
___________________________________________________ Playing with toys since 1970, now building them.
|
|
Rank: Advanced Member
Groups: Member
Joined: 6/27/2013
Posts: 937
Location: Quebec, Canada,
|
Transmission completed. I had to make a special trap for the sprocket which was slightly above the base plate. But it will make a window for checkup without having to disassemble the base. Of course, I have made sure that the wire jack support and the trap were not beyond the frame clearance with the tracks on. 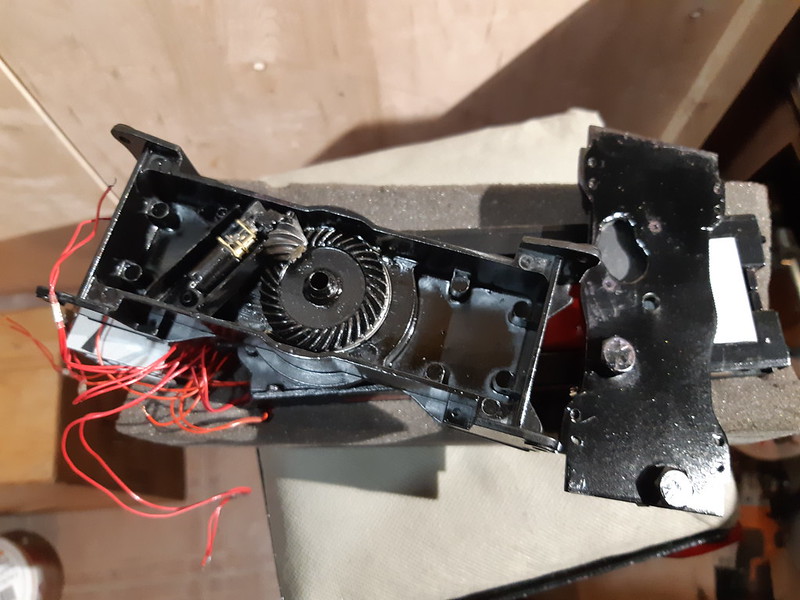 Pivot transmission Pivot transmission by Ironstef70, sur Flickr"/> 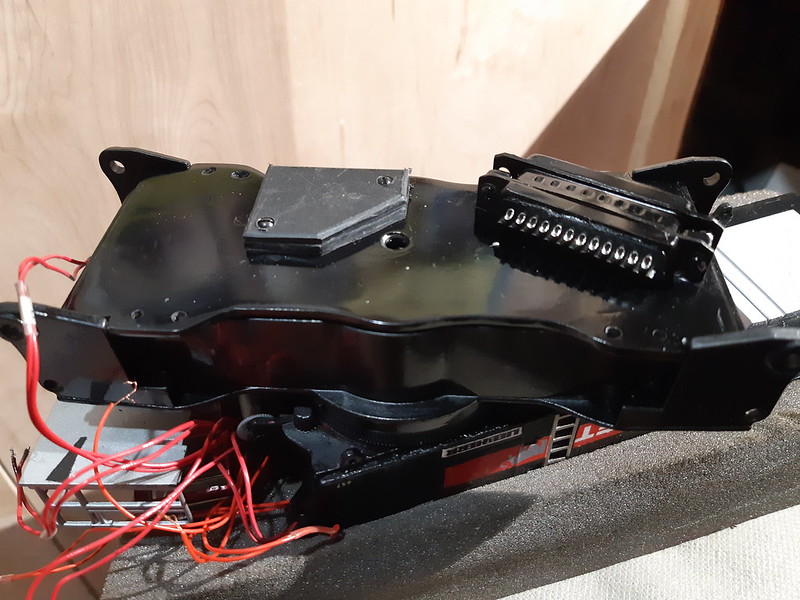 Sprocket cover & wire jack Sprocket cover & wire jack by Ironstef70, sur Flickr"/> S
___________________________________________________ Playing with toys since 1970, now building them.
|
|
Rank: Advanced Member
Groups: Member
Joined: 6/27/2013
Posts: 937
Location: Quebec, Canada,
|
Transmission completed. I had to make a special trap for the sprocket which was slightly above the base plate. But it will make a window for checkup without having to disassemble the base. Of course, I have made sure that the wire jack support and the trap were not beyond the frame clearance with the tracks on. Pivot transmission by Ironstef70, sur Flickr"/> Sprocket cover & wire jack by Ironstef70, sur Flickr"/> S
___________________________________________________ Playing with toys since 1970, now building them.
|
|
Rank: Advanced Member
Groups: Member
Joined: 6/27/2013
Posts: 937
Location: Quebec, Canada,
|
So the electrical job was more hectic that I had expected. It took me more than two weeks figuring out and correcting. I had to almost redo all the wiring layout (switches were not wired properly), then also had a pair of dead wires (must have cut them by mistake before coating them all). There was also a short circuit with the LED dimmer switch. So I have finally decided not to add LEDs and have all motors functioning instead. Still, I have tested everything, and I am very satisfied with the smooth operation. The custom operating console option was worth the headache. I then finished all connectors (this will allow for displaying in parts) and now starting to build up. I am missing the cables, so I will reel them later. As you can see, the power cable socket is slightly visible underneath, but won't be once assembled.  Another job Another job by Ironstef70, sur Flickr"/>  20201226_195625 20201226_195625 by Ironstef70, sur Flickr"/> S.
___________________________________________________ Playing with toys since 1970, now building them.
|
|
Rank: Advanced Member
Groups: Member
Joined: 6/27/2007
Posts: 1,489
Location: St. Louis, Missouri, USA
|
Awesome! Glad you were able to troubleshoot the gremlins out of the electrical system, but too bad about the LEDs. Will you at least be able to have a blinking red obstruction light on the boom tip?
Thanks for the updates!
|
|
Rank: Advanced Member
Groups: Member
Joined: 6/27/2013
Posts: 937
Location: Quebec, Canada,
|
JohnGalt wrote:Awesome! Glad you were able to troubleshoot the gremlins out of the electrical system, but too bad about the LEDs. Will you at least be able to have a blinking red obstruction light on the boom tip?
Thanks for the updates! I like the idea of the boom flasher. Not too much wiring: just a flashing LED with a dime-size 3v hidden battery could do. I've got my part of wire jobs for a while. I much prefer machining than wiring to tell you the truth. But I will eventually add details to the LR, such as scratch built light projectors, wiper blades and such: small soldering projects which will enhance its looks. I don't think it was worth putting too many LEDs in there anyways, as I won't "operate" the crane by night. S
___________________________________________________ Playing with toys since 1970, now building them.
|
|
Rank: Advanced Member
Groups: Member
Joined: 6/27/2013
Posts: 937
Location: Quebec, Canada,
|
- Manager: " So what is going on exactly with that crane? " - Mechanic: " We've been waiting for braided cable wire from China. Shipment is being blocked at customs or delayed."   20210106_215810 20210106_215810 by Ironstef70, sur Flickr "/> - Man.: " Okay, so what is going on in the meantime? " - Me: : " We've got started with the Manitowoc crane. We've dismantled critical parts in the port, and components are being hauled to the machine shop for modifications ". - Man: " Perfect, keep going, and keep us updated. "  20210106_215742 20210106_215742 by Ironstef70, sur Flickr "/>  20210106_215550 20210106_215550 by Ironstef70, sur Flickr "/>
___________________________________________________ Playing with toys since 1970, now building them.
|
|
Rank: Advanced Member
Groups: Member
Joined: 6/27/2013
Posts: 937
Location: Quebec, Canada,
|
I got hooked by another idea: custom hook blocks for smoother operation. Of course, these are overly strong for the task they will be used for, but weight is the criteria. These shown are meant to duplicate 100, 400 and 1000tons class LIEBHERR hook blocks. I am currently doing a 4-500 ton Manitowoc block too (not shown) Speaking of which, does anyone has picture or link to a 80-120 ton Manitowoc type of hook block? 18000 Would be best, but any Manitowoc in this class would be helpful.
 LIEBHERR 100-400-1000t blocks LIEBHERR 100-400-1000t blocks by Ironstef70, sur Flickr"/>
___________________________________________________ Playing with toys since 1970, now building them.
|
|
|
Guest |
