|
|
Rank: Advanced Member
Groups: Member
Joined: 8/18/2007
Posts: 255
Location: Isle Of Lewis
|
I will be casting my buckets it will be more usefull
|
|

Rank: Advanced Member
Groups: Member
Joined: 6/30/2003
Posts: 4,920
Location: Melbourne, Australia
|
Update: I spent some time this afternoon working on the upperstructure and have done about as much on it as I can for the moment. If I build it up too much, I will have trouble aligning and attaching the central pivot point from the undercarriage which is what I will most likely be working on next, along with the boom. If the body looks a little short that is because it doesn't include the counterweight which I will be molding a little later on. Anyway, pictures.... 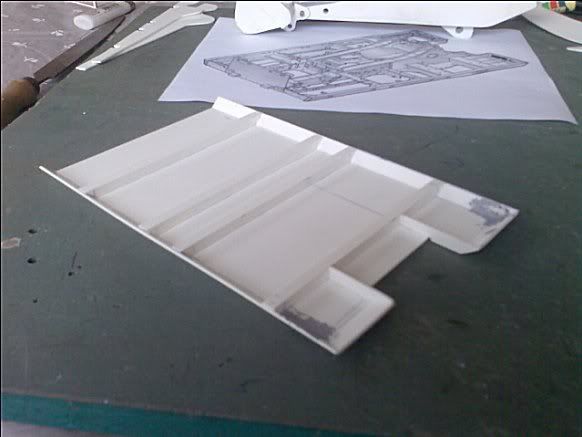 Here I have cut out the first part of the boom and lift cylinder attachments, pretty rough for the time being. 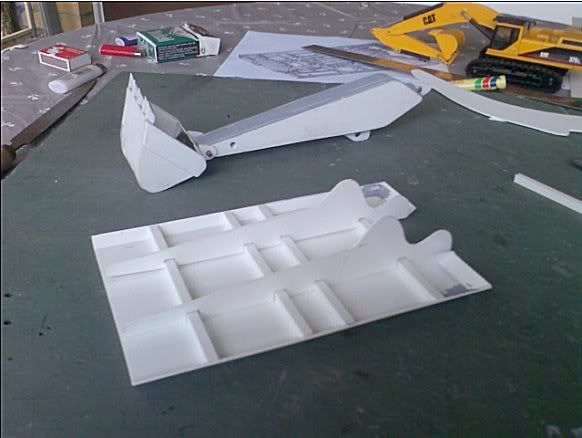 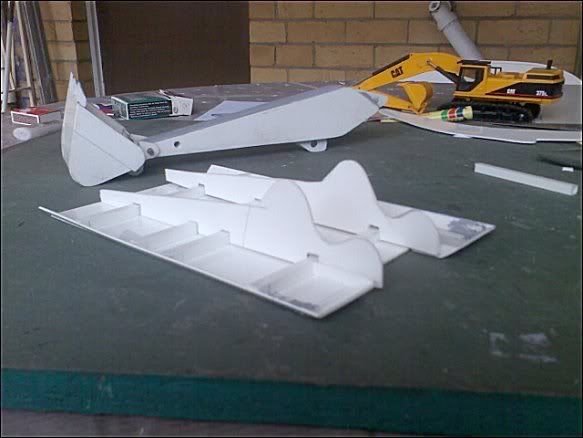 I also had some time to mock up the upperstructure, stick and I blue tacked the boom in place. 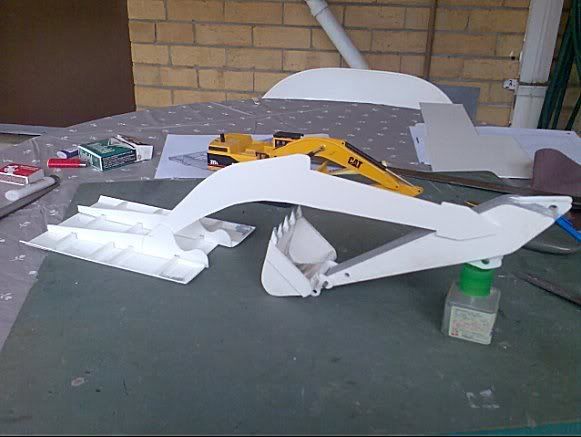   Thanks for looking. Rowan.
1:25th scale CAT 375L excavator
|
|
Rank: Member
Groups: Member
Joined: 10/1/2005
Posts: 38
Location: Italy
|
Great work!!!
|
|
Rank: Advanced Member
Groups: Member
Joined: 1/5/2006
Posts: 870
Location: Germany
|
Awesome! Keep up the amazing craftsmanship. 
Opinions expressed in this message are those of the author and do not necessarily represent the views or opinions of Caterpillar, Inc., a copyrighted trademark.
|
|

Rank: Advanced Member
Groups: Member
Joined: 7/9/2007
Posts: 445
Location: The Garden State
|
Thats going to be a huge machine.... very nice work on everything so far!  Can't wait to see it with some paint!
|
|
Rank: Advanced Member
Groups: Member
Joined: 8/10/2002
Posts: 1,762
Location: out of jail!!
|
 Great work, Rowan!! It looks good. Quite honestly, i am amazed to see what can be done with styrene... With a little bit of imagination, you can do miracles and create absolutely anything. And, it is very solide too. Keep up the good work. Max.
Cat 245.....Now and Forever 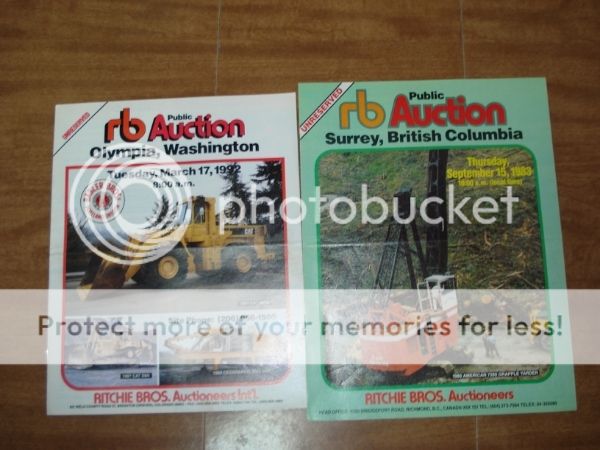 I am looking for industrial auction brochures from Ritchie Bros, Miller & Miller, Forke Bros, First Team Auction, Max Rouse, etc from the 70's, 80's and 90's.I am a collector and heavy equipment enthusiast and these pamphlets are loaded with nice pictures of cleaned and freshly painted equipment.Thet don't have much value once the sale is over but they are a great help to me in preserving the memory of machines that are no longer being built.Please, help my hobby by looking in your old storage boxes and file folders for these old auction sale brochures.Your help is much appreciated.
|
|
Rank: Advanced Member
Groups: Member
Joined: 6/30/2003
Posts: 4,920
Location: Melbourne, Australia
|
Alright, I've been very busy with work around this time of year however I have done a little bit of work on the 375. I managed to cut out all of the boom pieces, roughed in and assembled the main piece. I also had a chance to cut out new linkage pieces. Here are all of the boom pieces cut out, rather roughly I might add. 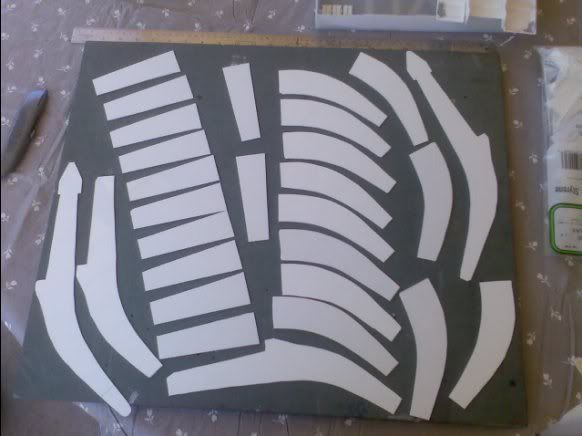 I drilled attachment holes in center and end pieces before assembly so avoid difficult drilling later on. 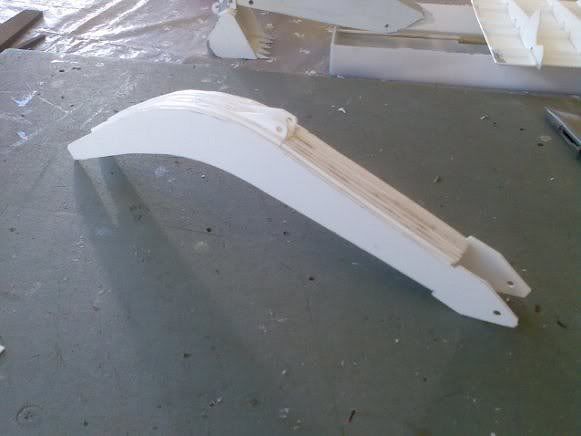 The early stages of the assembled boom. As you can make out from the pictures, it is still very rough but nothing a little bit of work can fix up. I still need to shave (I've upgraded from the hand files to an electric bit sander), putty, re-sand, and build up the base forked arms. 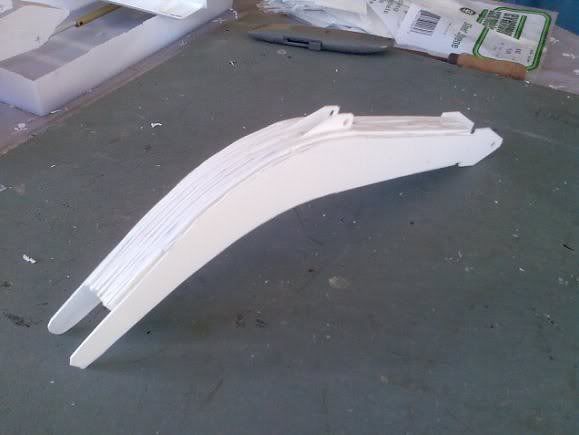 Alongside the stick, I'm working with 1.5mm styrene so the boom is a total of 3mm thicker than the stick to allow the stick to sit between the attachment points. 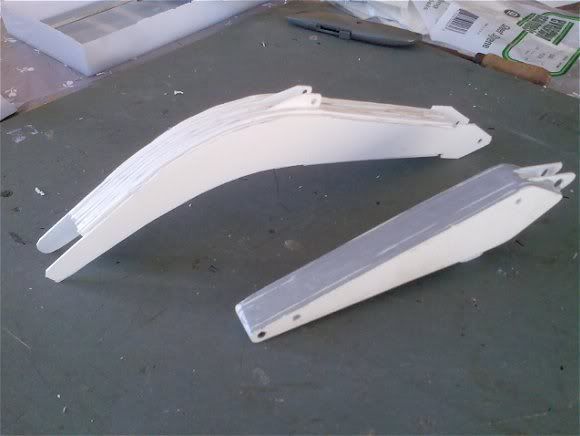 Mocked up, with the stick and bucket attached. I also added in the boom hydraulic cylinder. I still need to measure out the idea length of the inner cylinder so I have the most movement out of the arm. 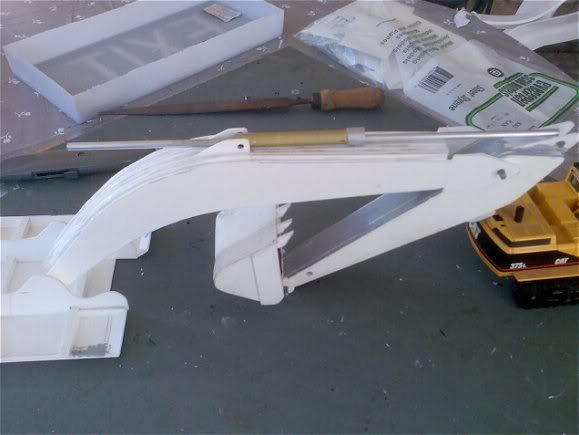 Another view of the boom mocked up with the upper-structure frame. 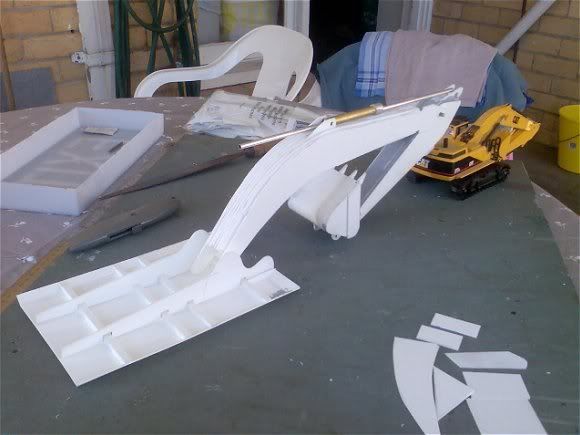 Showing off it's reach with the 1:50th scale Joal CAT 375 tucked underneath for scale reference. 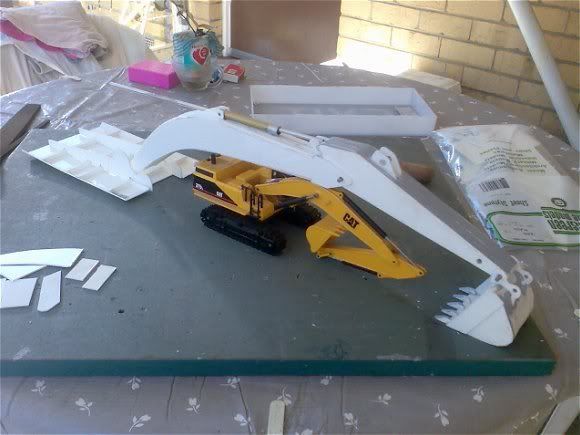 The new bucket linkage pieces roughed in. I still need to shape them a bit more but they are already better than the old pieces. 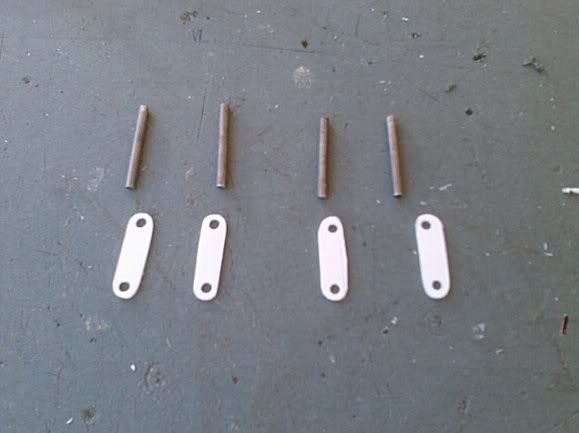 The bucket assembly. 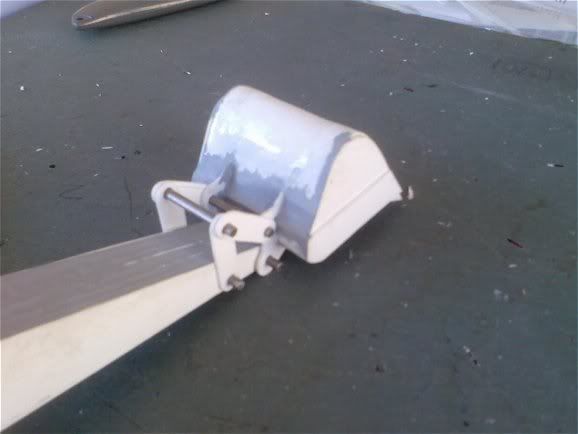 Profile picture of the assembly.  Assembly resting on the boom. 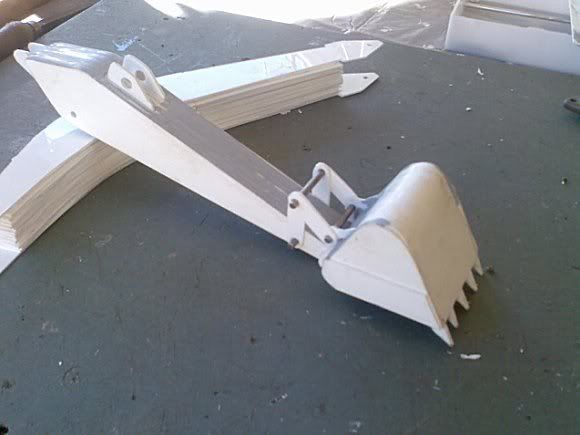 Thanks for looking. Rowan.
1:25th scale CAT 375L excavator
|
|

Rank: Advanced Member
Groups: Member
Joined: 8/9/2006
Posts: 795
Location: New South Wales, Australia
|
Oh man, Rowan! That is looking great! I am almost drooling at the thought of the final result! Really, really well done! Cheers, Craig
 The Caucasianaasian The Caucasianaasian
|
|

Rank: Advanced Member
Groups: Member
Joined: 5/12/2006
Posts: 2,262
Location: NY
|
Awesome job Rowan! Simply stunning! -Greg
|
|

Rank: Advanced Member
Groups: Member
Joined: 1/23/2007
Posts: 3,636
Location: Staten Island NY
|
WOW! very nice Rowan!
|
|

Rank: Advanced Member
Groups: Member
Joined: 6/12/2006
Posts: 1,924
Location: Massachusetts
|
looks great Rowan, keep us updated, Jim

|
|

Rank: Advanced Member
Groups: Member
Joined: 9/16/2007
Posts: 2,707
Location: Staten Island, New York
|
|
|

Rank: Advanced Member
Groups: Member
Joined: 8/8/2002
Posts: 5,515
Location: New Jersey
|
Real nice work Rowan and by the looks of it time consuming too with mutiple stacked sheet buildup any reason you didn't op for the 385C or prefer the 375 ?Bucket teeth look cool !  Regards Chet
I live in my own little world it's ok they know me here
|
|
Rank: Advanced Member
Groups: Member
Joined: 6/30/2003
Posts: 4,920
Location: Melbourne, Australia
|
Thanks for the comments guys, much appreciated, hope you enjoy following the build as much as I am enjoying building it. Chet, I've always been a big fan of the larger CAT excavators and if the 375 turns out to be a success, I will attempt a 385CLME next, also in 1:25. I also had in mind that because this is my first time working with styrene I decided that a 'boxier' machine would be better to start with so I wouldn't have to do as much round molding. I can tell you now that the counterweight is going to be a real challenge. I plan on shaping a counterweight out of wood before heat softening a sheet and pulling it down over the mold to get the right shape, I can see it taking a lot of trail and error. I also decided on the costly and time consuming method of sheet piling the styrene for the boom and stick to give the machine a bit of weight and durability. The car body will by made of a frame although I will most likely add ballast in parts so it isn't so front heavy. Thanks again, Rowan.
1:25th scale CAT 375L excavator
|
|
Rank: Advanced Member
Groups: Member
Joined: 8/8/2002
Posts: 5,515
Location: New Jersey
|
Yeah Rowan 385CLME the one to do !This one can't wait to see painted ...Happy modeling looking Terrific especially for first time !
Regards
Chet
I live in my own little world it's ok they know me here
|
|

Rank: Advanced Member
Groups: Member
Joined: 4/7/2003
Posts: 821
Location: Runnemede, NJ
|
RowanH wrote:Thanks for the comments guys, much appreciated, hope you enjoy following the build as much as I am enjoying building it. Chet, I've always been a big fan of the larger CAT excavators and if the 375 turns out to be a success, I will attempt a 385CLME next, also in 1:25. I also had in mind that because this is my first time working with styrene I decided that a 'boxier' machine would be better to start with so I wouldn't have to do as much round molding.
I can tell you now that the counterweight is going to be a real challenge. I plan on shaping a counterweight out of wood before heat softening a sheet and pulling it down over the mold to get the right shape, I can see it taking a lot of trail and error.
I also decided on the costly and time consuming method of sheet piling the styrene for the boom and stick to give the machine a bit of weight and durability. The car body will by made of a frame although I will most likely add ballast in parts so it isn't so front heavy.
Thanks again,
Rowan. I can't wait to see that, it'll be a beast for sure! Your 375 looks great so far Rowan I can't wait to see it finished.
Rob
|
|
Rank: Advanced Member
Groups: Member
Joined: 6/30/2003
Posts: 4,920
Location: Melbourne, Australia
|
I got some time over the past few days to do some more work on my model. I managed to almost complete a piece that I was really looking forward to building and that was the cab. I also did some more work on the boom and worked with some different tools. Firstly, I was getting real tired of using files and sanding paper so I decided to step it up a notch with this electric drill and grinding bit. It was a new bit so it was a bit grabby at first but it got better once I spent more time using it. It saved a LOT of time. 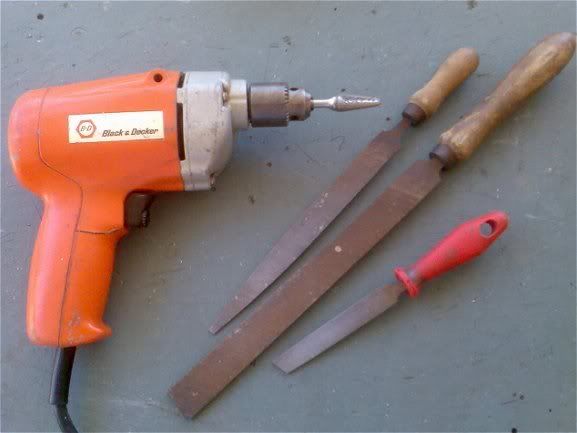 A thick coat of putty was applied to the top side of the boom. Like on the stick, I didn't bother with the section between the cylinder attachment wings because it will be covered by the hydraulic cylinder itself. 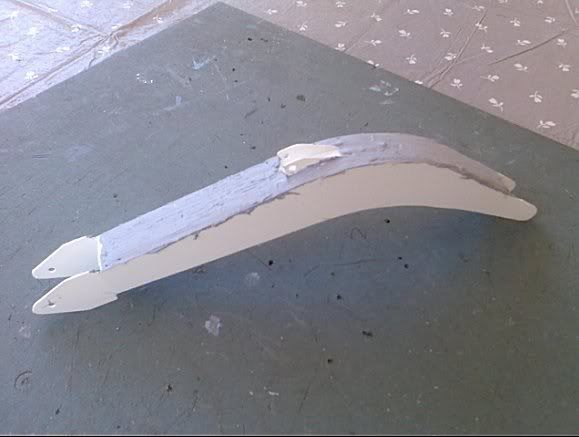 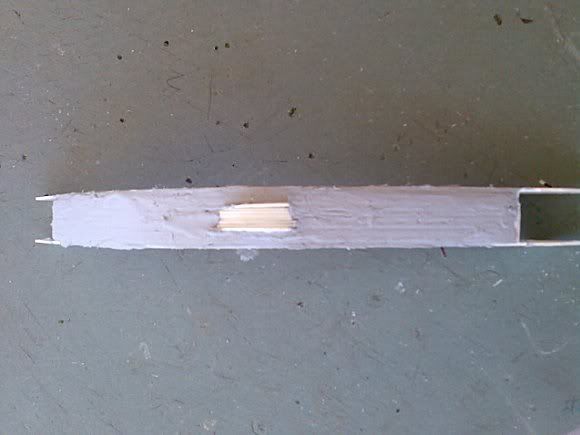 Here are the first shots of the cab walls glued together. 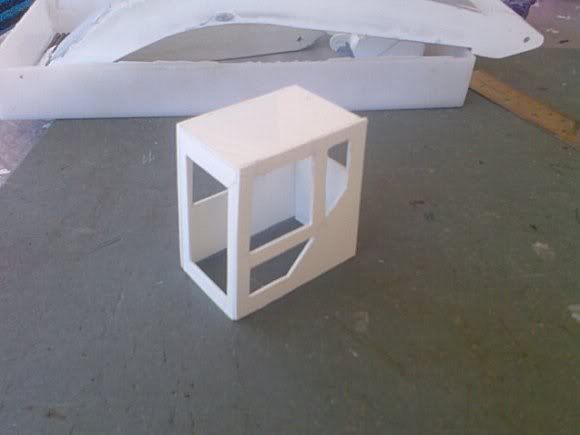 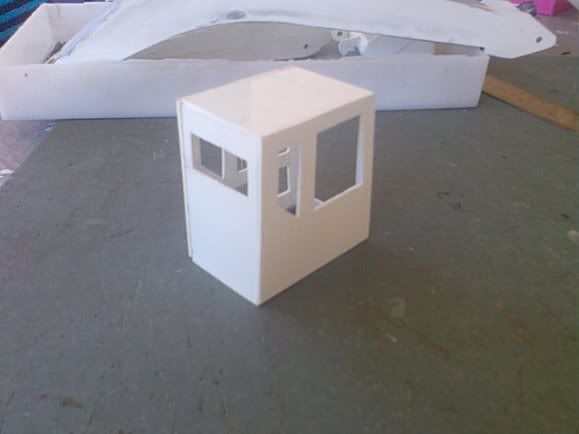 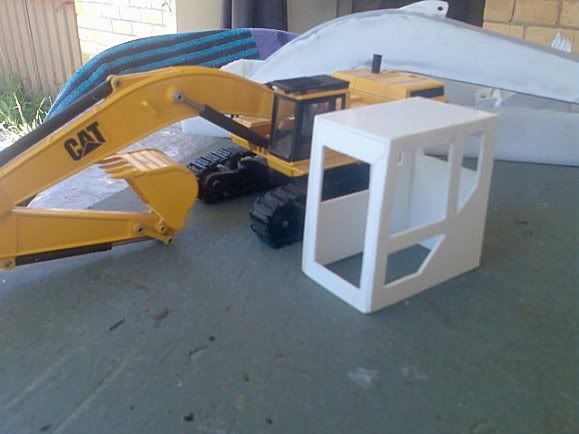 Oops, forgot the sunroof... time to improvise, bring out the drill... 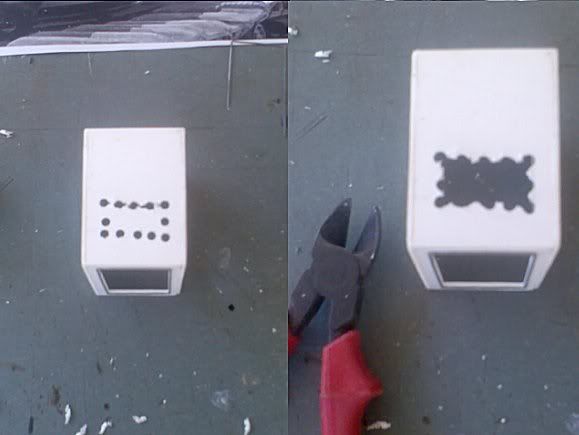 From my reference pictures, I noticed that there were 2 types of cabs commonly used on the 375, most likely due to the fact that the machine being built over so many years. The main differences between the two types were the window shapes and the position of the door handle. I decided to build the cab that was on the Joal 375, I also had a couple of good reference pictures to build off. This thin wire was used to create window lining and the ventilation grate on the side. 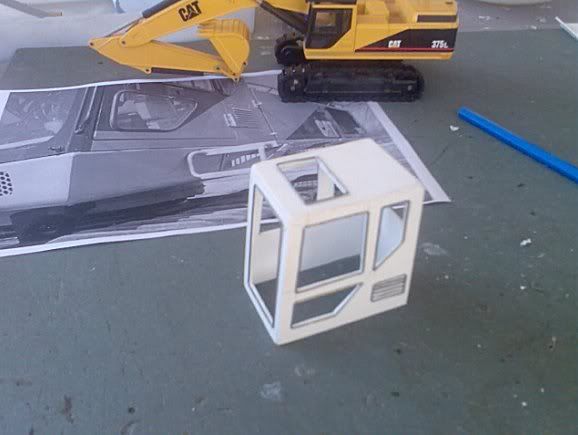 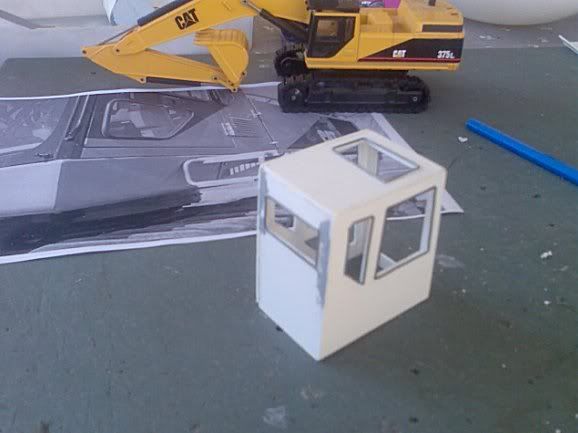 I still have to add the actual door lining but I decided to wait till after paint otherwise it will be too difficult to mask with all the raised edges. I also have some clear plastic ready for the window inserts. Now that the cab is complete, a part that I am not looking forward to building will be the operators seat and controls. It shall be interesting to see how they turn out. 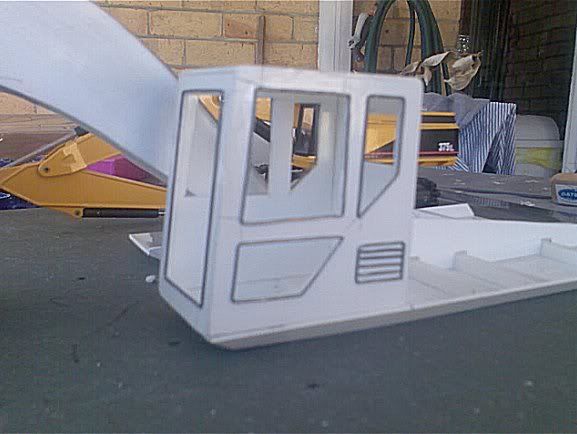 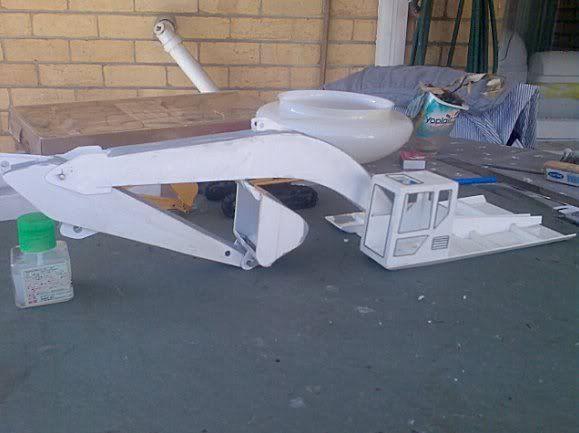 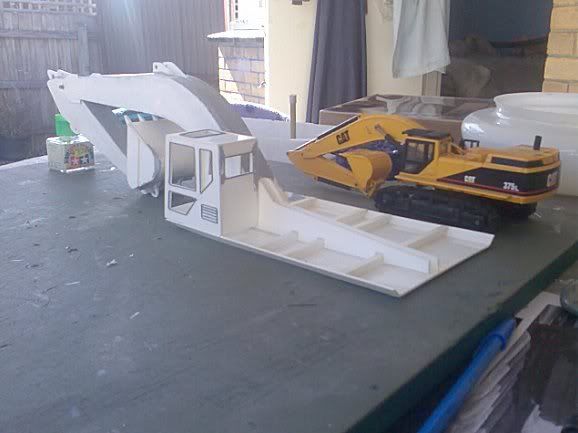 I also got some more work done on the boom and the upper-structure but it was a little dark to take some more shots so I will take pictures tomorrow. Tomorrow I will also finish up carving the woodern counterweight that I will use as the mold. Thanks for looking. Rowan.
1:25th scale CAT 375L excavator
|
|

Rank: Advanced Member
Groups: Member
Joined: 10/4/2005
Posts: 990
Location: england
|
That looks great Rowan,are you going to paint it CAT colours or an Oz company livery?
|
|
Rank: Advanced Member
Groups: Member
Joined: 6/30/2003
Posts: 4,920
Location: Melbourne, Australia
|
Thanks modelmaniac, as of now the machine will be completed in the original CAT scheme. Most Australian contractors simply apply company name decals (if any decals at all) to the boom and counterweight from my observations so unfortunately we don't get the flashy liveries like most European and Asian companies. One other question for anyone that may be able to help, I'm still not sure which CAT paint should I use? The new or old yellow? I have used the new CAT yellow previously in the spray can and it is a great quality paint however, from memory the actual 375's were last built in the early 2000's, did they paint them in the new or old CAT yellow? Thanks, Rowan.
1:25th scale CAT 375L excavator
|
|

Rank: Advanced Member
Groups: Member
Joined: 8/27/2002
Posts: 4,829
Location: New Jersey
|
|
|
|
Guest |
